 English
 Русский
 Português
 Español
 Հայերենով
 Türkçe
 Български
 中文
中文 ქართული
 Français
 日本語
日本語 Қазақ
ҚазақIntroduction
You've installed employee monitoring program Kickidler; you have approximate understanding of its functionality, and, perhaps, you've already read the Documentation. Now it's time to start customizing the program for the needs of your organization and get acquainted with the main methods of its use!
Time tracking system Kickidler will help you automate the function of control of personnel, increase efficiency of employees and avoid leaks of important confidential information.
Having applied these recommendations, you will be able to start using Kickidler effectively.
There are two versions of Kickidler – EM (Employee Monitoring) and TT (Time Tracking).
Kickidler TT is intended for soft monitoring of employees and is geared towards reports and analytics.
Kickidler EM is designed for comprehensive employee monitoring, and besides the analytical tools found in the TT version it also contains tools for visual monitoring, such as online PC monitoring, screen video recording, keystroke logging and remote PC control.
To put it in even more simplified terms: Kickidler TT is just the Web interface of the software, while Kickidler EM is the Web interface plus Viewer.
Note: if you have purchased the Kickidler TT version, you will not be able to use everything that is in the Viewer. Thus, you do not need to install the Viewer. Only the reports in the Web interface will be available.
We've divided this manual into two semantic parts. The first part will tell you how to adjust all functions of the program in order for it to work effectively. The second part will describe the main techniques of working with the program. This section will be gradually updated, so we recommend you add it to favorites.
Part I. Program setup
Getting started with Kickidler
Once again make sure that all components of the program are installed and work correctly. The most common mistakes during installation are described in the FAQ section of our website. Is everything working properly? Then you can start fine tuning the functionality of Kickidler.
Two main components of Kickidler program that you'll use to change the settings of the program and monitor employees are Viewer and Web interface of the Central Server.
Viewer allows you to watch employees' screens in real time, monitor history of actions at the PC and transcript of keystrokes, identify violations of the schedule and browse Basic reports – Report on time, Report on efficiency, Report on dynamics. Remote access to the employees' PC is also available through the Viewer of the program.
To go to the Viewer, you should click on the automatically created icon on the desktop.
Web interface of the Central Server, like we've already said, is used for all main settings of the program. Also, in addition to three basic reports, there are additional reports, like “Details of the day” report, Report on working hours, Report card on working hours, Rating of employees, Report on applications.
To go to the Web interface, you should follow instructions from this section.
Another part of our program that should be mentioned is the Personal account of the user. Personal account can be used to buy licenses, receive invite key and also select the Central Server.
Start by running the Viewer program component. You can read in more detail about navigation in Viewer here.
As a reminder, the Viewer is only available for the Kickidler EM version.
Creating the structure of the organization
 In the "Tracking" section of the Viewer component you will see a grid with boxes that show monitors of all the employees, whose computers have the Grabber element of the program. If your company is using the Active Directory service, then the structure of the organization and names of employees will be created automatically.
If your company isn't using the Active Directory, you'll have to do everything manually. By default (if you don't have AD) all users are assigned system names. For your convenience we recommend you assign each employee their real name and also create an organization structure and add all users to the corresponding divisions. It's much more convenient to work with Ann Brown from Marketing department than with a faceless user of DESKTOP-2NK8RIP.
To edit employees' names and divide them by departments, you should go into the Web interface of the Central Server of the program.
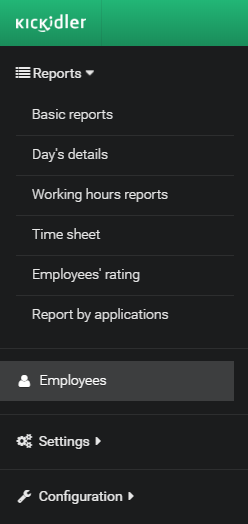
Go into the "Employees" section of the Web interface on the sidebar.
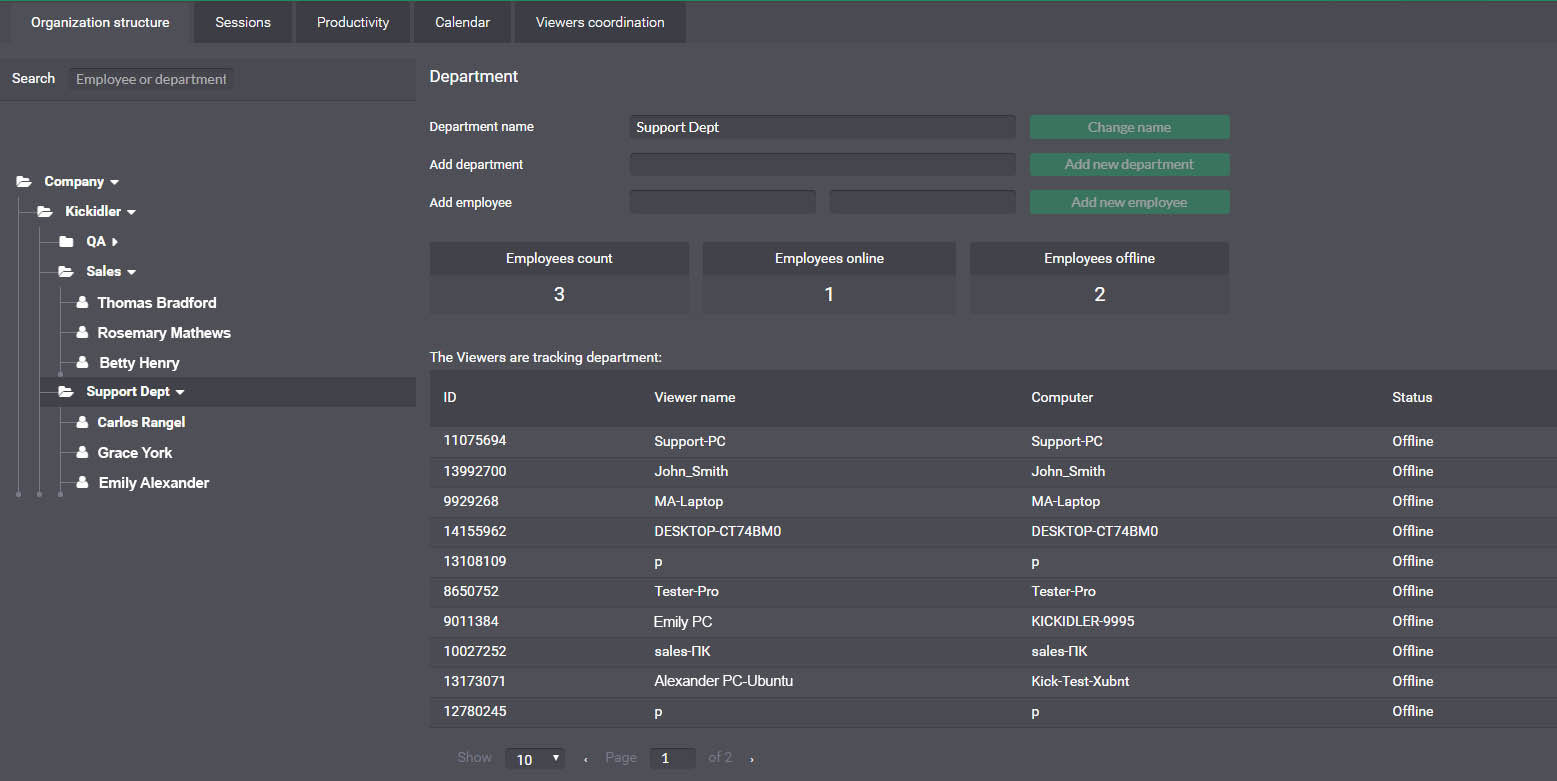
In the "Organization structure" tab of the "Employees" section you can create the structure of your company that includes departments, offices, etc. and also rename and sort the employees that work in these divisions.
The structure of the organization in the Kickidler program is edited by the Drag'n'Drop method, that is, you can grab the element with your mouse and drag it wherever you need.
You can also transfer an employee or a whole department using the “Change the department” button.
In the "Sessions" tab you can adjust monitoring of user accounts. It's convenient when, for example, one employee works from several personal computers or, on the contrary, several specialists use one personal computer and work under different accounts. The program allows the supervisor to control several sessions of the employee on different personal computers at once or control the session of a certain computer account. We recommend you apply this option during interactions with remote workers if they use their own personal computer for work.
Here's another example. Your employee works at the work computer during office hours and then finishes some projects at home. In order to take into account all the time they've spent working, your employee is ought to create a special work account on their home computer. Our program will count working hours of the employee on two devices, but it won't allow the employer to see what the employee is doing on the home PC by default. We think it's a very important function, because the legislation demands the employers count all the hours that employees have spent working.
In the "Distribution of the Viewers" tab you can assign what Viewer can monitor which structural division. It is made that way so that, for example, heads of departments could control only their direct subordinates.
Adjusting "Productive calendar"
While you are in the "Employees" tab, let's adjust the "Productive calendar" as well.
Select the "Calendar" tab of the "Employees" section. Here you can create the working calendar for each employee and also set lunch breaks, holidays, weekends, business trips, sick leaves and absences. Another thing that's configured in the "Calendar" is the beginning and the end of the workday and the break.
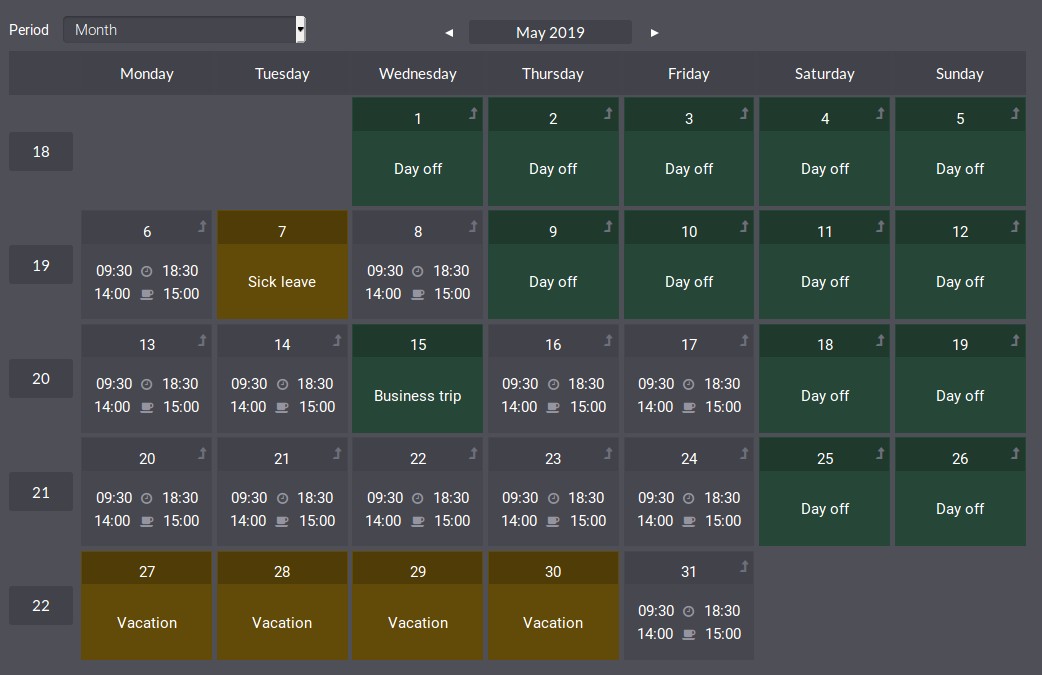
You can configure the calendar both for each specialist separately and for the whole department (or the whole company). Setup of the calendar is intuitive, and we won't dwell on the details.
Taking these settings into account, the system will count the time an employee has worked from the moment they turn on the computer and start doing something only during the hours that are specified by the operating schedule. You will also be able to analyze productivity of your employees only during their working hours.
You can look at the obtained statistics in the Viewer and the Web interface of the program. You can also configure the option of sending reports in the Excel format on Email whenever it's convenient for you and with preset frequency.
Pay special attention to this function. Working calendar that's been configured correctly will allow you to get the most exact statistics regarding your personnel. This option is also essential for collecting correct information in all Kickidler reports.
Configuring "Analytics of productivity"
There is one more tab in the "Employees" section of the Web interface of the program called "Productivity". Here you can assign productivity estimation to any website or program. It will give you the ability to collect and analyze all statistics on productivity of personnel.
It’s convenient to take the websites and programs that are often used by an employee from the "Report on time" that's available in the Viewer of the program.
We recommend you configure analytics of employees' productivity at least a week after installation of our system, so that all the necessary data regarding the users' behavior can be collected. Another thing is, once a month the correction of settings and evaluation of new websites and apps that have been used by the specialist should be carried out.
However, in the test mode in order to get approximate idea of program options you can configure productivity a day after installation of Kickidler system.
How exactly estimations are established? Everything is simple! If an app or a website is used by the employee for work, then it is "Productive". If it's used for personal reasons, then it's "Unproductive". If an application or a website can be used both for work and for personal reasons, then it's better to set it as "Neutral".
For example, job searching website will be considered productive for HR manager, but for an employee of any other department it won't be productive. Google search engine can be used for work and for personal reasons; therefore it's better to set it as "Neutral". Respectively, SAP app will be "Productive" for accountants, Adobe Photoshop can be considered "Productive" for designers.
Our program by default has a preconfigured list of 700 popular unproductive websites. All other evaluations have to be done manually; there's no other way to do it.
You can assign overall evaluations of productivity both for structural division and for every employee. You can combine sources of evaluations, if necessary. For example, the employee will have some evaluations that are common for their department, and then there will be some that they receive individually.
The categorization of websites and apps can also be made in the "Report on productivity" of the "Reports" section in the Viewer of the program.
By default all websites and apps are categorized as "Not evaluated".
Configuring "Control of violations"
In 2020, we've completely redesigned the “Violation Control” feature to make it even more user-friendly!
Before we start configuring this set of tools, let's take a look at what “Violations” mean in terms of our program.
A violation is an illegal (undesirable) action of an employee during work hours, whether it's visiting a forbidden site, starting a program, using portable storage unit*, being late for work** or doing unproductive activity for a specified period of time.
Supervisors can get information about employee violations both instantly by setting up automatic notifications and on a specific histogram of violations.
How to configure the list of violations?
To configure the list of violations, you need to go to the Web interface of the Central Server of the program, => then open the “Settings” section on the side panel, => choose the “Violations and notifications” subsection.

Here you can create violations and violation groups, configure automatic notifications and in general enable, disable or remove violations.
By clicking on the “Add Violation” triangle icon you open the Violation Filter. Here you can create violations based on your individual needs.
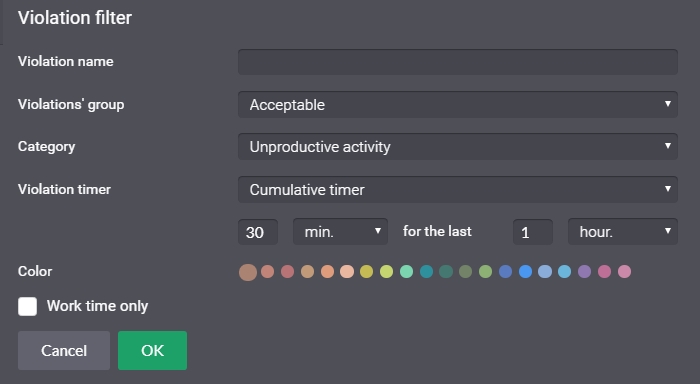
Our program allows you to record violations of the following types:
- Activity (productive, unproductive, neutral)
- Inactivity
- Program usage
- Web page usage
- Title
Moreover, you can set a violation timer that will record immediate, continuous and combined violations.
Immediate violation will be recorded at the moment of the action.
Example: an employee opens a job search site.
Continuous violation will be reported when an employee has done an undesirable action within a specified period of time.
Example: an employee has been inactive for 1.5 hours.
Combined violation will be recorded if an employee has been performing a certain type of action within the specified period of time.
Example: an employee has been browsing social networks for more than 15 minutes per hour.
What's even more, our program by default has a predefined list of violations, which can also be edited.
Note: The predefined list of violations is created rather to help you understand how the program works, and you should definitely edit and update it based on the behavior patterns of your employees.
By default, the violations you create – and we want to stress it – will be applied to all employees in your company. To disable certain violations for a structural unit, you need to go to the Viewer, => click the “Tracking” section, => then go to the tab with the unit you need, => click the “Violations” menu and disable the group in question.
To disable violations separately for each employee, you need to open their window in the Viewer (“Tracking” section), then go to the “Violations” menu and, using mobile switch, disable the group of violations for that employee.
How to control employee violations?
With the Violations Control feature, the supervisor can get real-time information about the actions of the employees several ways:
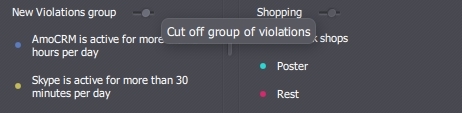
- First, immediate violation can be seen in real time at the bottom of the employee’s window in the “Tracking” section of the Viewer. In this case, the section with violations is located in the lower left corner of the employee's window.
- Second, Viewer has a section where all the violations are shown on the histogram.

To open the histogram of violations, open the employee's window by clicking on it and then go to the “Violations” tab.

“Violation histogram” will be displayed. It shows the violations and their intensity during the selected time period. The wider the bar on the histogram, the more frequently the employee has been committing the violation (for example, scrolling a banned site).
- Another place to view the violation histogram is the Viewer's “History” menu. To open it, you need to click the
 button under the video player.
 - And finally, our program has an option of configuring automatic notifications on violations. You can find more information about automatic notifications in the Autokick section.
* To create a violation regarding portable storage units usage, select the “Title” category and in the window with the titles enter “autorun, automatic start”. The trigger will be activated whenever the autorun window is opened on your PC.
** We'll tell you how to create a violation on lateness in the “Autokick” section.
Autokick – automatic notifications and self-monitoring tools
Autokick tool is our new feature of 2020! More details about what it is and what it can be used for are available in the “Autokick” section of our website.
Configuring automatic notifications
The “Automatic notification” function is directly linked to the “Violation control” function. That is, you can create an automatic notification for an employee only on a violation that you've already created (and we wrote about configuring violations above).
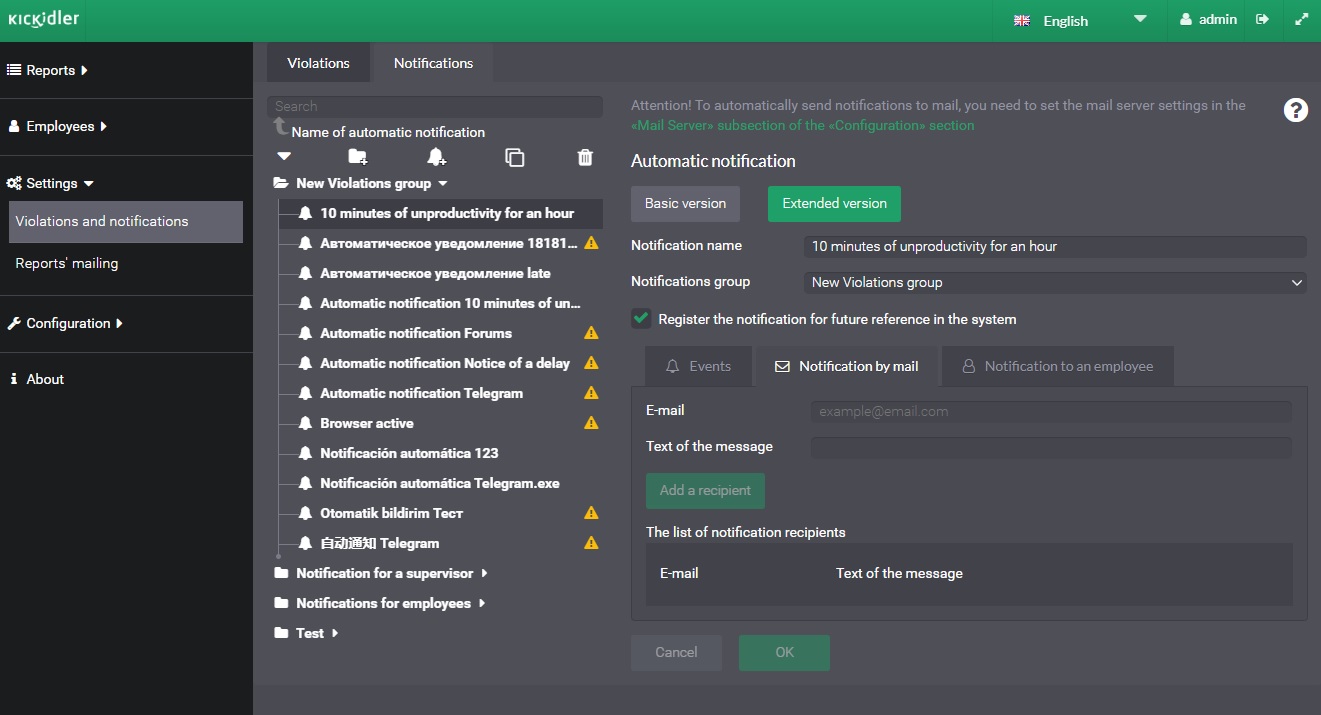
To set up automatic notifications, go to the “Violations and notifications” section of the web-interface of the Central server => open the “Automatic notifications” tab.
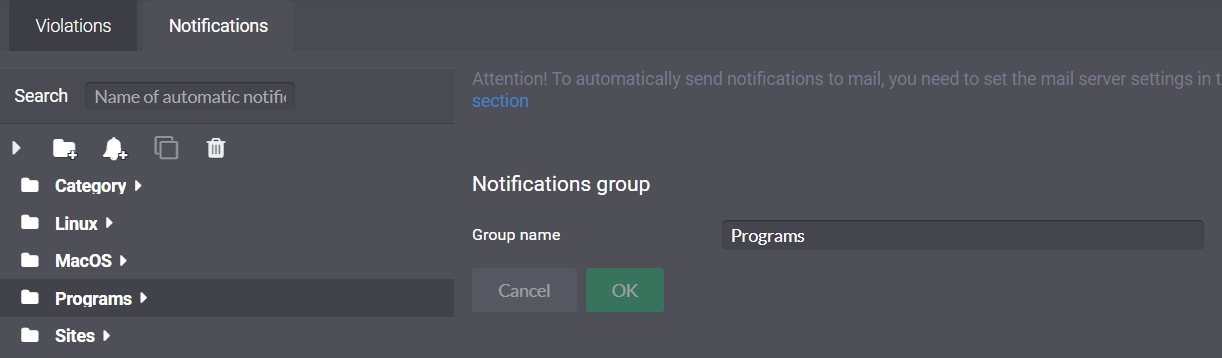
Here you can also create automatic notifications, organize them into groups and delete them.
To create a new automatic notification, click the bell icon. The Automatic notification creation window will open.
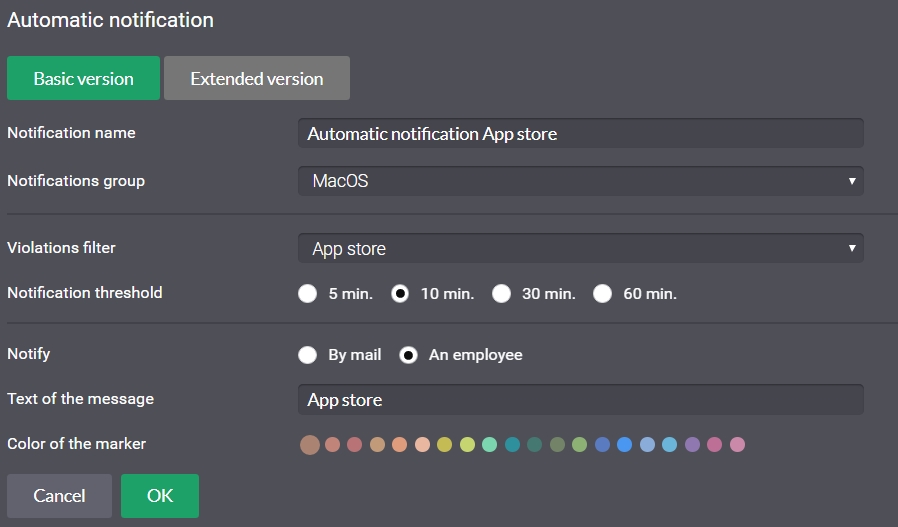
Here you can create and edit a notification name, link it to a group and so on.
The “Violation filter” line allows you to choose which violation will be triggered by a certain notification. We described how to configure the list of violations earlier in this article.
The “Notification threshold” line allows you to choose the interval at which the notifications will be shown.
The “Notify” line allows you to choose to whom the notification will be shown – either to the employee in the form of a pop-up message or to the supervisor via email. You can choose both options.
The “Message text” line allows you to configure the text that will be shown to the employee.
Please note that our program has both Basic and Extended versions of the Notification filter.
In the extended version of the Notification creation window, you can add several events to one notification and send notifications to several emails.
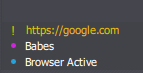
The notifications will be displayed in the lower right corner of your PC and look like this:


Note that the color theme of both the notifications and the self-monitoring interface can be customized in the software settings.
Linking Automatic notifications to employees and departments
Choose the “Employees” section of the Web interface of the Central Server => assign which employees or departments will be able to see the notifications you’ve created in the “Automatic notifications” tab.
Automatic notifications are enabled and disabled using the following buttons.
![]() – enabled.
– enabled.
![]() – enabled, fixed*.
– enabled, fixed*.
![]() – disabled.
– disabled.
![]() – disabled, fixed.
– disabled, fixed.
*Fixed means that the changes of the whole group don't apply to this notification.
** So how do you create a violation on employee lateness? It's simple – you can create a notification of lateness manually. Notification => Extended version of the Notification => Events => Event Type: work schedules => In the drop-down list: lateness.
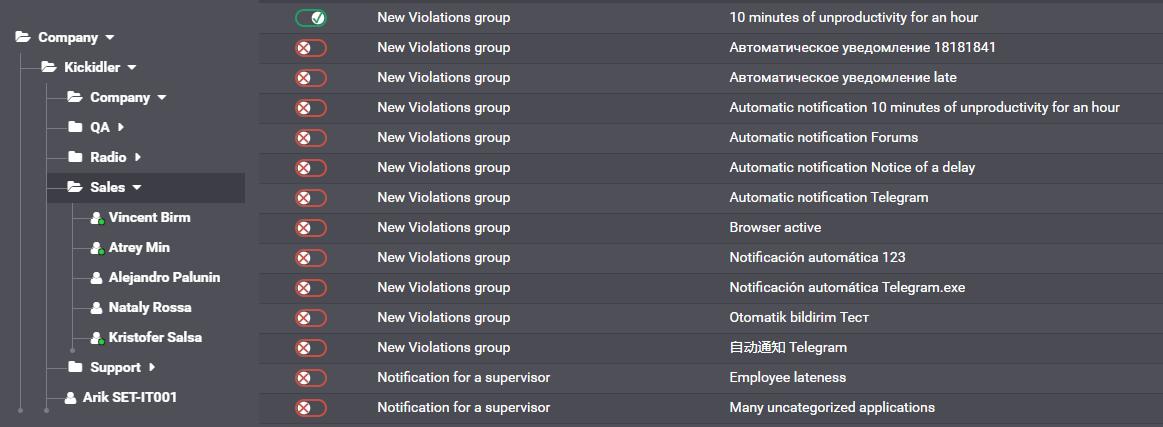
How to assign a notification to an employee or a department?
Vertical menu – Employees.
Horizontal menu – Automatic Notifications.
Here you will see a tree of your entire organization on the left and a list of all activated and deactivated notifications on the right. You can assign a notification to a particular employee or department, as well as to the whole company at once.
How to backup notifications to the manager's email?
Notifications received by employees can also be duplicated to the manager's email. To do this, go to the vertical menu, select Settings => Notifications and violations, then in the opened horizontal menu select Manage automatic notifications => Advanced version, where there will be a “Notifications by mail” box.
Here you can specify an email address (either yours or not) to which notifications will be sent when an employee is late or, for example, has been lingering in social networks for too long.
For the notifications to work properly, you will need to configure the mail server settings in the "Mail Server" subsection of the "Configuration" section of the vertical menu.
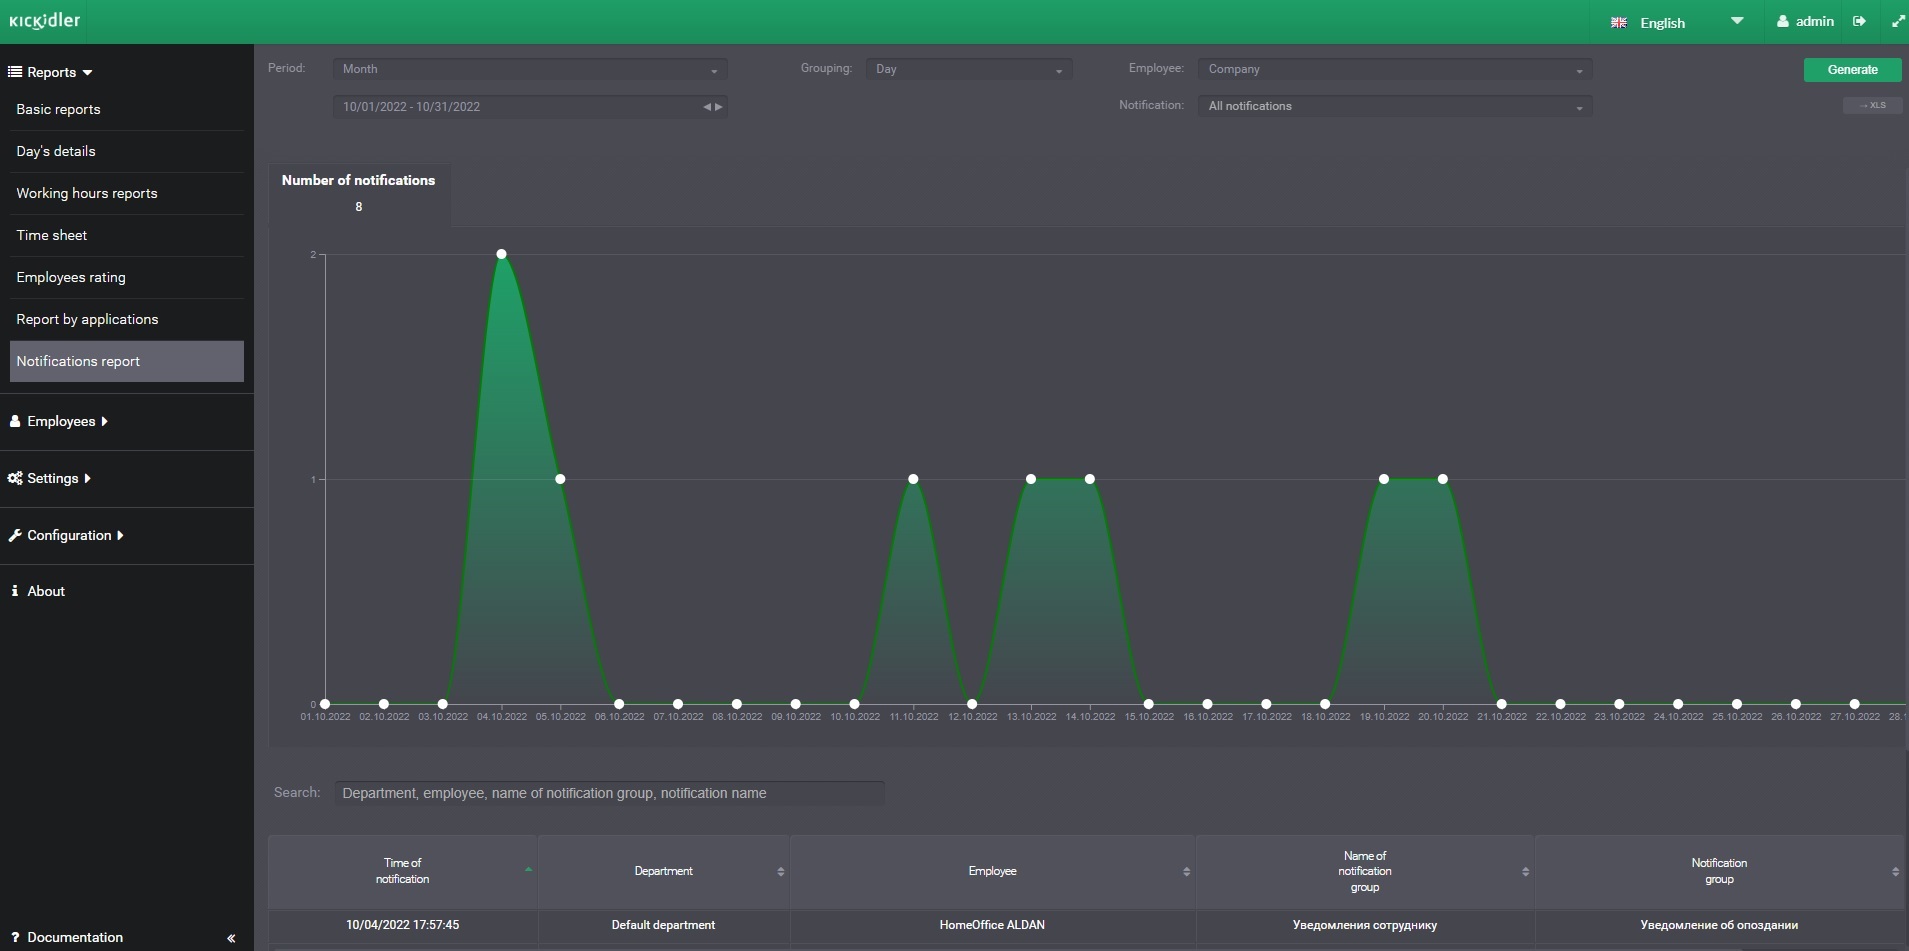
Reviewing the Report on notifications
Kickidler report on notifications allows the manager to better analyze how often all the employees are receiving notifications.
The report looks like this:
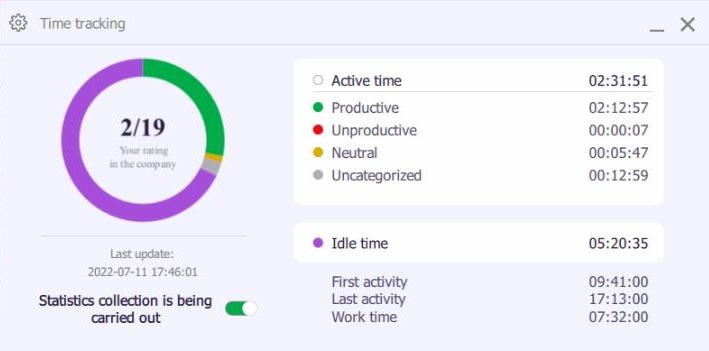
Turning on the self-monitoring interface
In the “Employees” section of the Web-interface of the Central Server => enable and disable the employee self-monitoring interface in the “Kickidler self-monitoring” tab.
Please note that if the “Show employee the self-monitoring interface” switch is ON, the employee will only have an icon in the desktop tray.
In the nearest future, the function of enabling and disabling employee Grabber will be displayed here.

To enable the possibility of viewing the daily statistics, the “Show employee the daily statistics” switch should be ON. In this case, an employee is able to see the window below with their statistics that’s updated every 30 minutes.
Configuring video recording from computer monitors
As you know by now, our program records video history of employees' actions at the computers. You can configure storage life of these videos and frame rate based on your needs. Besides, it will allow you to save the place on the Server if that's required.
To set up video storage, go to the "Components and Coordination" section of the Web interface. By default the "Servers" tab will open - that's exactly what you need.
Select the Server you need (if you have several servers) and in the last column titled "Actions" press on the icon of a pencil. A menu like this should open.
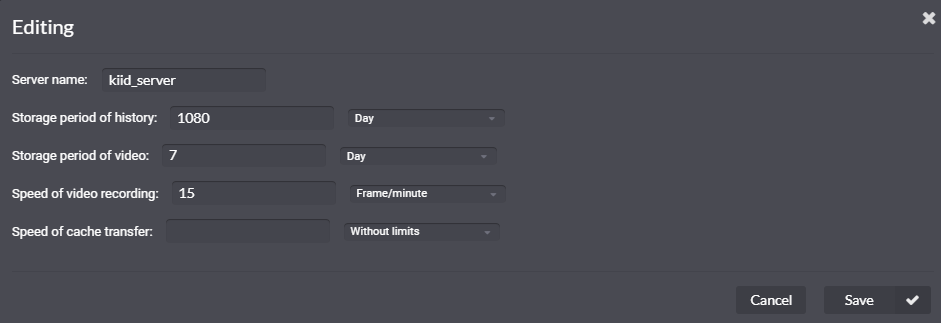
There you can configure the Period of video storage, Speed of video recording and Speed of cache transmission (the speed with which data will be transferred if Internet connection is lost).
You should keep in mind that recording 1 work day of an employee with default settings (that is, 1 fps) will take about 2 GB of space. You can save space on the Server by choosing in settings the period of 2 days and the bitrate of 5 frames in a minute, but it will affect the quality of video and the time it'll take you to watch the video.
If you just don't want to keep the video, set "0" value in the "Period of video storage" column.
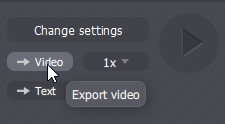
By the way, the video you save can be exported in the Webm format that's supported by the majority of video players. To do that, you should go to the Viewer of the program, select the "History" menu and press the "Video" button in the bottom left corner. Once again, for the video to load quicker and weigh less, you can configure its quality and speed.
Also in the "Components and Configuration" section of the Web interface of the program you can configure the Period of history storage, that is, the amount of time all statistics on employees (except video) will be stored. The statistics don't take that much space, so we recommend you to store it for the period of not less than one year.
Configuring sending reports to email
If necessary, you can configure the emailing of reports. Reports will come in the Excel format at a time of your own choosing, with the frequency you select and to the addresses that are also selected by you. You can configure the option of sending reports in the Web interface in the tab of the side menu
Setup => Emailing reports.
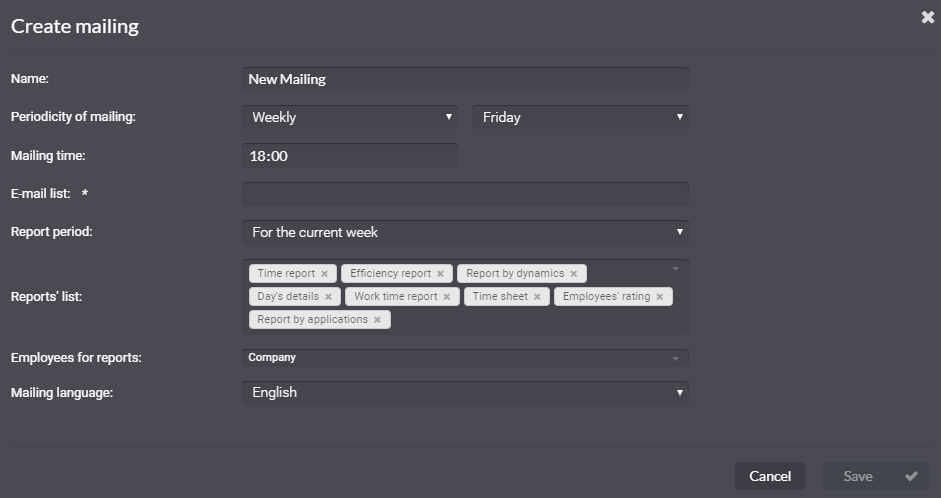
Emailing reports is a convenient option when you don't have access to the computer yet you still want to see analytics on your employees. Perhaps, you are on vacation or a business trip, but you still want to monitor what's happening in your company. Then you should definitely configure the emailing of reports, and you'll be able to watch statistics on your mobile device.
Besides, with this function you'll be able to automate the process of creating time sheets by simply configuring emailing of the corresponding report at the end of every month.
Do you want your employees to know who's been the most productive so that they are motivated? Configure emailing of the "Employees' rating" report to all subordinates at the end of the week.
Have you applied all the recommendations we've mentioned in this article? Then the program is successfully configured and ready to be used!
Part II. Using the program
In this part we’ll give you some universal advice on how you can use our program. We’ve gathered these pieces of advice from using the program ourselves and listening to our clients’ experiences.
Advice 1. Configure access levels to the program
The first thing we recommend you do when implementing our program is setting the access levels to its components.
Access that has been correctly configured helps minimize time expenditure when it comes to employee monitoring. It also helps make monitoring more logical and safe.
Below we’ve attached two standard hierarchies of using our program. One picture illustrates the company with employees that work in the office, and the other – the company with remote workers.
Option 1. Company with office workers
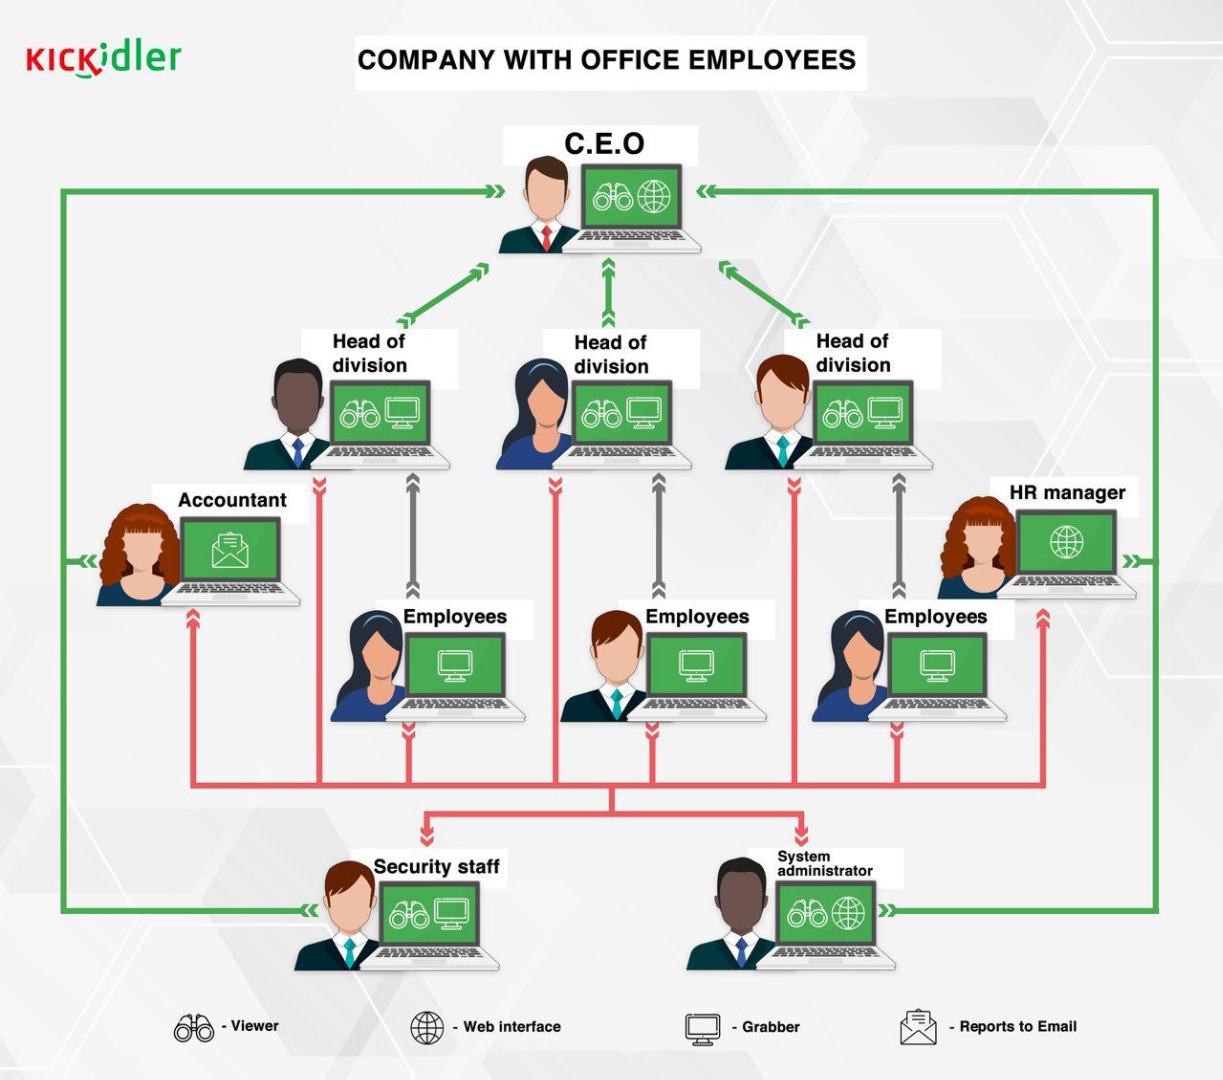
C.E.O.
- Viewer has access to monitoring all employees of the company, including heads of divisions, security staff, HR managers, and different workers.
- Web interface allows reviewing extended reports on working time and productivity.
Accountant.
- Monthly e-mail distribution of reports on working time and time sheets.
Heads of divisions.
- Viewers have access only to PCs of the employees of their divisions.*
- Grabbers transmit data only to C.E.O. and security staff specialists.
Security staff specialist.
- Viewer has access to monitoring all employees of the company.
- Grabber transmits data only to C.E.O.
HR manager.
- Web interface allows reviewing extended reports on working time and productivity.
System administrator.
- Viewer has access to monitoring and remotely accessing PCs of all employees of the company.
- Web interface allows configuring time tracking system and distributing access rights.
*You can set productivity rates for websites and apps not only by having access to Web interface, but also by using Viewer. You can read about it in detail in the first part of this series. It’s recommended every head of the division set productivity rates for their direct employees, whose work they know firsthand.
Employees.
- Grabbers transmit data only to the head of their division and other people in the hierarchy.
Option 2. Company with remote workers
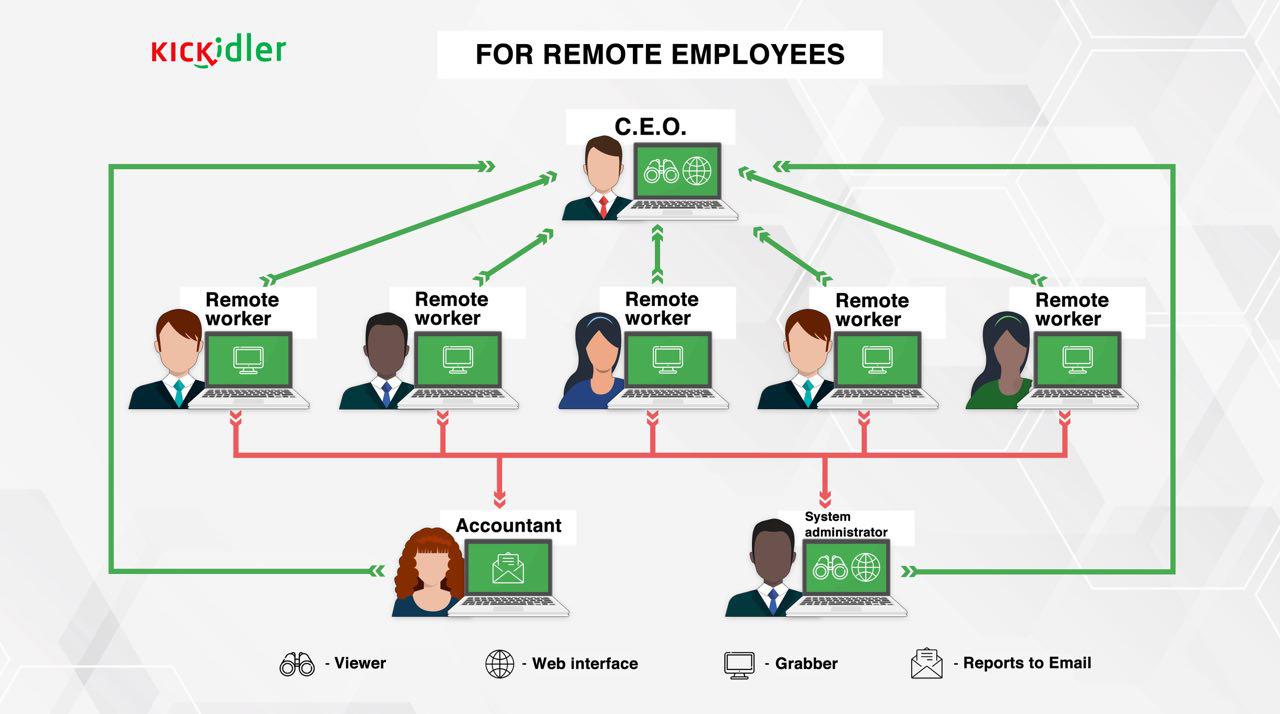
C.E.O.
- Viewer has access to monitoring all employees of the company.
- Web interface allows reviewing extended reports on working time and productivity.
Accountant.
- Monthly e-mail distribution of reports on working time and time sheets that play important role in payroll.
System administrator.
- Viewer has access to monitoring and remotely accessing PCs of all employees of the company.
- Web interface allows configuring time tracking system and distributing access rights.
Remote workers.
- Grabbers transmit data to C.E.O. and Accountant.
Viewers allow seeing what other colleagues are doing and coordinating their work.
Advice 2. Determine the productive norm
It would be wrong to set the percentage of productive activity, for example, 70% a day, as the norm for all employees. Some employees often attend different meetings, some spend a lot of time calling clients, and some need time to think various tasks trough. Therefore, a very important aspect of understanding time tracking system is defining productivity standards for employees in different positions.
For example, support service specialist would have 80% productivity as good percentage; 65% would be considered good number for a sales manager. Depending on the specifics of your company, these indicators may vary. However, configuring precise settings for our program is a must. We've mentioned that in the first part of this guide.
Look up to the best!
How can you determine the productivity rate? It's simple. You should use the “Employee Rating” report in order to determine the productivity of the best employee who has a specified range of responsibilities.
Collect statistics on your employees for a month at least. Generate the “Employee Rating” report so that the employees are grouped by the same scope of responsibilities. Identify leaders and focus on them.
“Report on dynamics” allows you to see changes in productivity of particular employees.
The following are approximate productivity standards for different professions.

Productivity norm in % of total working time
- Customer support specialist – 80%
- Web designer – 80%
- Content manager – 80%
- Accountant – 75%
- Economist – 75%
- Coder – 70%
- QA engineer – 70%
- Analytics manager – 70%
- Product manager – 70%
- Lawyer – 65%
- Designer – 65%
- Marketing manager – 65%
- Sales manager – 65%
- Journalist – 60%
- Copywriter – 60%
- SMM manager – 60%
- Top manager – 50%
P.S. It’s best to analyze not only the productive activity, but unproductive activity as well, and idle time, too.
Advice 3. Make monitoring as transparent for employees as possible
This advice is more psychology-related, than actually technical. Make monitoring of your employees as transparent as possible, so that it doesn't cause negative reaction. On the contrary, it can become a way to establish trust inside the company.
- Tell employees what monitoring is and how it will be carried out. Let them know that nobody will watch their screens closely, unless, of course, they start slacking off blatantly.
- Explain why monitoring is important and what benefits the employees can receive from it.
- Tell them that sanctions will be imposed only for vehement slackers; responsible specialists won't notice anything different with implementation of the monitoring system.
- Set rules, according to which monitoring will be carried out, and tell these rules to your personnel.
- Follow those rules precisely.
- Recommend your employees to not use the working computer for personal correspondence, input of credit cards passwords, etc. All of them have phones that can be used for those things.
- Tell employees that it's okay to spend up to 45 minutes a day on personal affairs and nobody will scold them for it. It's nice to take three 15-minute breaks every day.
- Summarize by noting that monitoring will allow you to become fairer to those employees who carry out their duties responsibly.
Advice 4. Use all Kickidler’s options
Ultimately, our program is designed to make your business more successful. All the tools we develop and implement into our product are aimed at achieving this goal. If you want to get the most out of our program, we recommend you use at least 90% of our program capabilities for your business.
Try online monitoring, recording of activity, time accounting, productivity analysis, reports on working time, and monitoring of violations.
Combine our program with other solutions like CRM systems, task and project management programs, DLP systems, and call trackers.
Our program isn't stale. It's constantly developing and acquiring new capacities. New functions of our software that will appear in the nearest future will further expand the field of its use.
Advice 5. Read our clients’ cases
Be sure to read our client cases and tell us about your experience with our program. The accumulated base reveals new opportunities and areas where our program can be used that even we had no idea about.
Here are some of our clients' cases:
- How to cheat employee monitoring software?
- The cunning programmer, or the story of how a “freelancer” was caught
- How the insider who was stealing the client base was found
- How does monitoring employee PCs affect profits?
- Kickidler case: Implementing employee monitoring software in an insurance company
- Finding cheaters and underloaded specialists in tech support
- How to set up monitoring of 1'200 computers?
- Monitoring through the eyes of a remote employee
- How to effectively monitor the work of freelancers?