Read the article for installing the program components using AD.

  • Sign in to the user account on the site and go to the Settings section,
  • Click the button "files for mass installation",
  • In the window that opens, select the file you want to install with AD,
  • Click the Download button and wait till the download is completed,

To install the program components with AD, learn the article.

If Viewer cannot run without errors, try theese ways:

  • update videocard drivers,
  • if you have the latest videocard drivers, update DirectX on the link

If these ways don’t help, write to us on help@kickidler.com.

If you need to save local Viewer settings, follow these steps:

  • open the folder config (directory by default: C:\Users\User\AppData\Local\KickidlerViewer\config);
  • copy settings_3.sqlite.

In this local file Viewer structure settings, efficiency categories and violations’ settings are saved. If you need to move local settings to another Viewer, open the folder config and change settings_3.sqlite on copied earlier one.

If in the Viewer you can see the message “Attention! No access to the Central Server. In order to restore the access, contact your Kickidler software package system administrator or use the following instructions”, follow the following steps in order to perform an independent access restoration:

1. Check to see if the Central Server is accessible from the computer, on which the Viewer is installed.

How to understand that there is no access:

Find the port (by default for Windows: 7906 and for Linux: 1025) in the node.ini file and run the telnet command in the command prompt.
 
Attention! Before using the telnet command, make sure that it is enabled. 
Windows: telnet %ip address of the Central Server% 7906
Linux: telnet %ip address of the Central Server% 1025
Example: telnet 192.168.11.11 7906
Solution: if an error occurs, there is no access and you need to configure the mixed networks. Read more here.
 

2. Check to see if the firewall is blocking the operation of the Viewer and Central Server.

How to understand that it is blocking:

Open the command prompt and run the following commands:
 
telnet my.kickidler.com 40401
telnet %ip-Central Server Address% 8123 /8123 — port of the web-based interface of the default Central Server, if another port is specified in the node.ini file in the [http] block, it is necessary to first run the telnet command for that port
 
Solution:

It is necessary to perform the following for correct operation of the Kickidler software package:
  • allow outgoing connections for the Viewer and Central Server on my.kickidler.com to the TCP ports 40401 and 7905,
  • allow incoming connections to the TCP ports that are registered in the node.ini file (by default for Windows: 7906 and for Linux: 1025) and the web-based interface port of the Central Server (8123 by default or the port that is registered in the node.ini file in the [http] block).

 3. Check to see if the Central Server is running.

How to understand that the Central Server is not operating:
  • go to your Personal account, open the section “Licenses”, and find your Central Server;
  • if the date and time are specified in the column “Recent connection” in the license table, these are the date and time when the Central Server last operated. 
Possible Causes of Nonoperability:
  • the disc runs out of free space.
Solution:

Open the Central Server logs, which are located here by default:
Windows: C:\Program Files\KickidlerNode\log
Linux: /opt/KickidlerNode/log/

and check to see if there are any records in the log:

ERROR std exception during log video frame: ERROR: could not extend file "base/16385/3710192.227": No space left on device
HINT: Check free disk space.

If there are such records in the log, you need to clear some space in the database.

  • The Server service has not been started (nns for Windows, kickidlernode for Linux). 
Solution:

If it has not been started, it is necessary to start it. If it has been started, restart it.
  • The database cannot be launched
Solution:

Open the Central Server logs and check the log records:
QPSQL: Unable to connect
2016-10-20 14:07:40.142 2424 ERROR database connection failed: could not connect to server: Connection refused (0x0000274D/10061)
If there are such records, check to see if the PostgreSQL processes are running and if they relate to the Kickidler software package Server component. If this is the case, complete all the PostgreSQL processes, associated with the Kickidler Server, and restart the Server service (nns for Windows, kickidlernode for Linux).
  • The directory, into which the Server has been installed, should not be used for the database
Solution:

Open the Central Server logs and check the log records:
2016-11-07 14:24:06.392 7696 FATAL unable to initialize data directory for internal
postgresql instance
If there are such records, reinstall the Server into the directory full path to which uses the Roman alphabet only.

 
             Attention! If all of the mentioned above has not helped to solve the problem, contact the Kickidler Technical Support.              

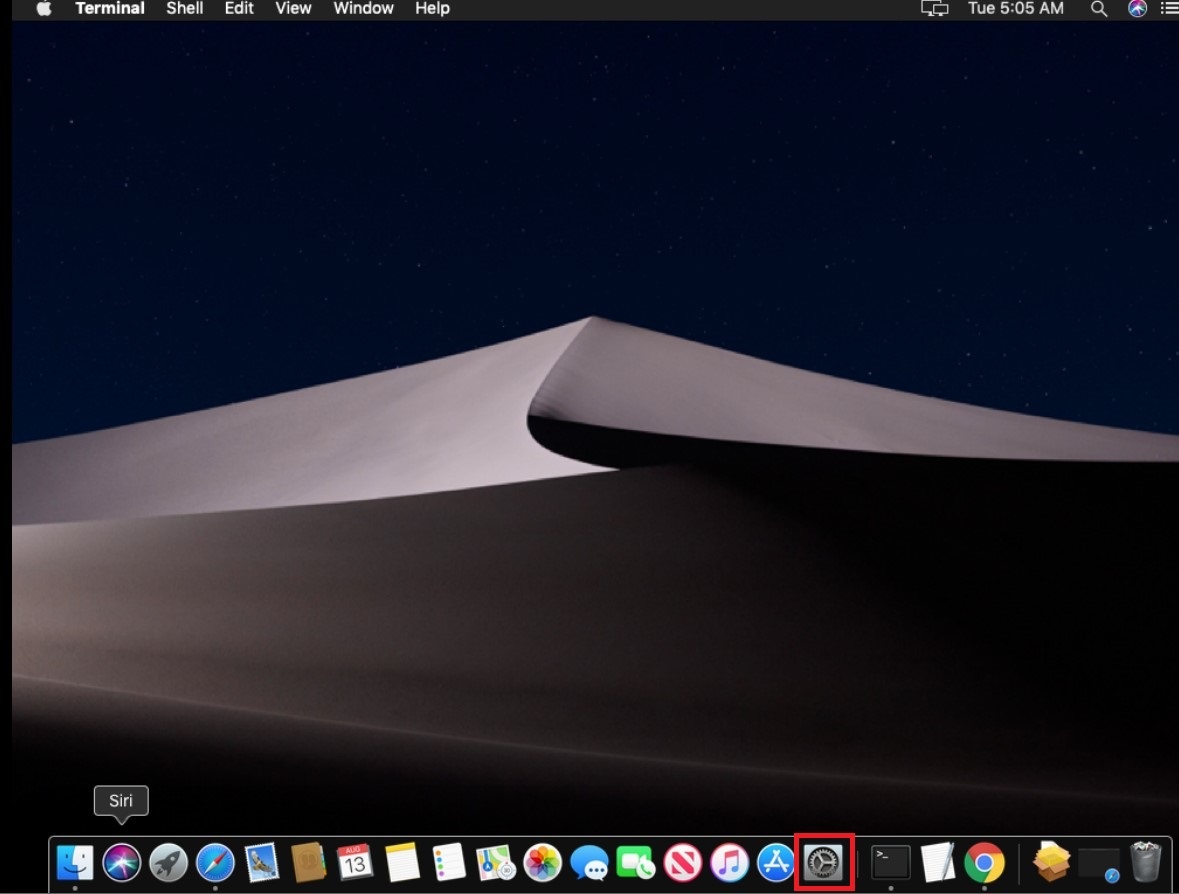
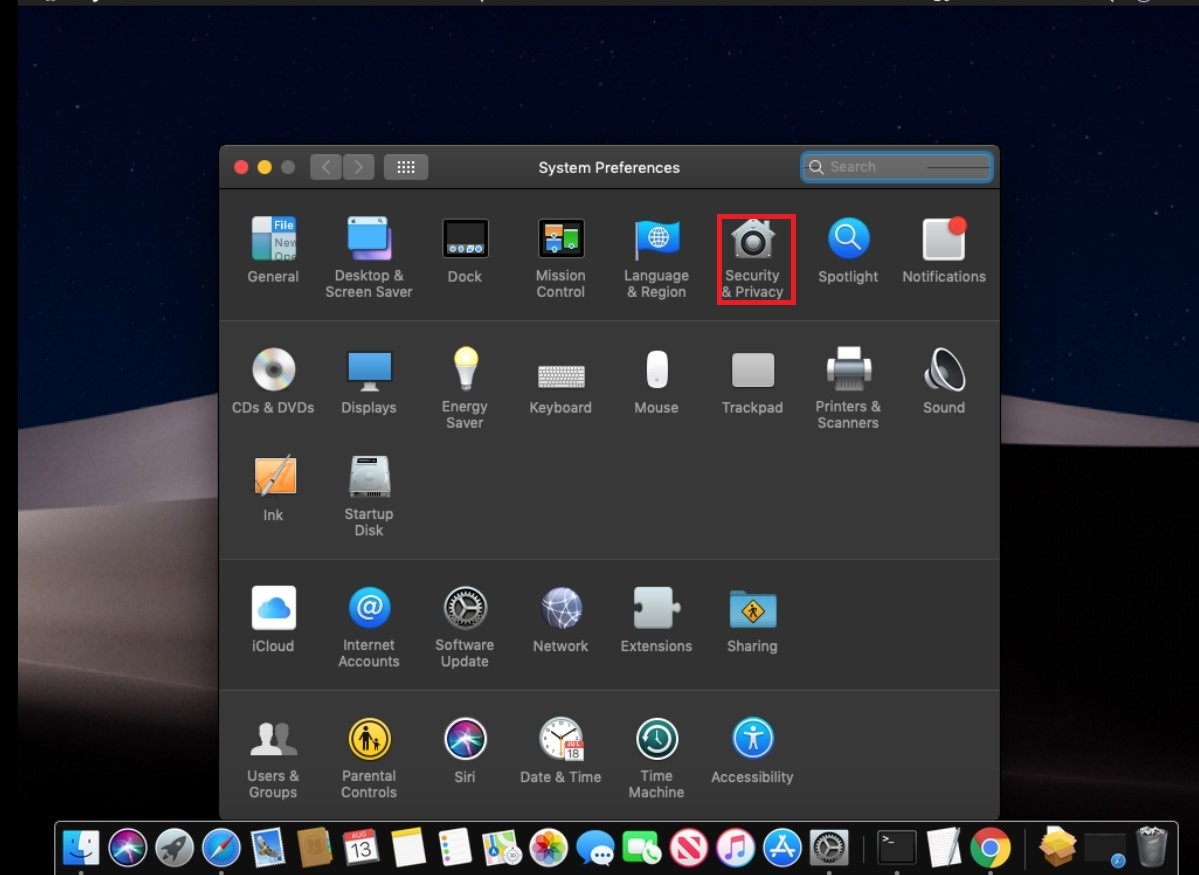
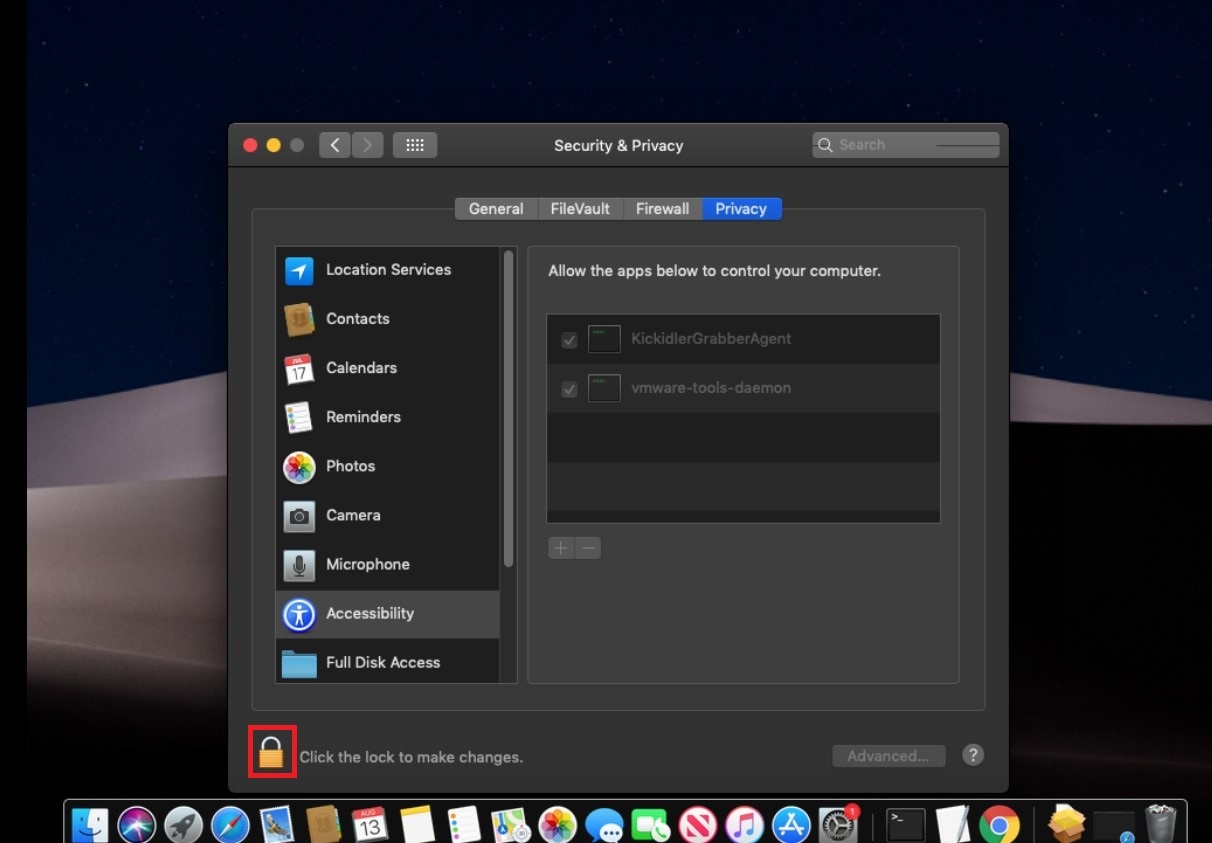
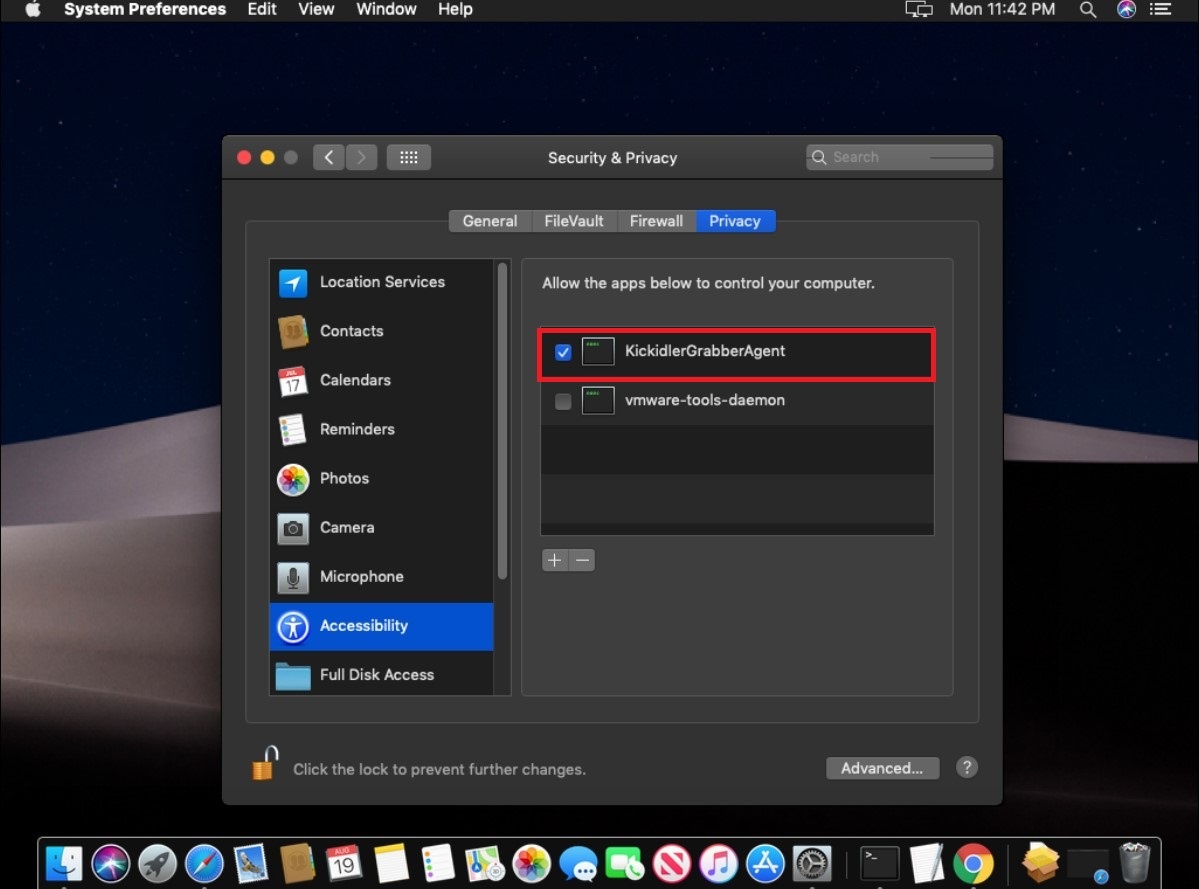
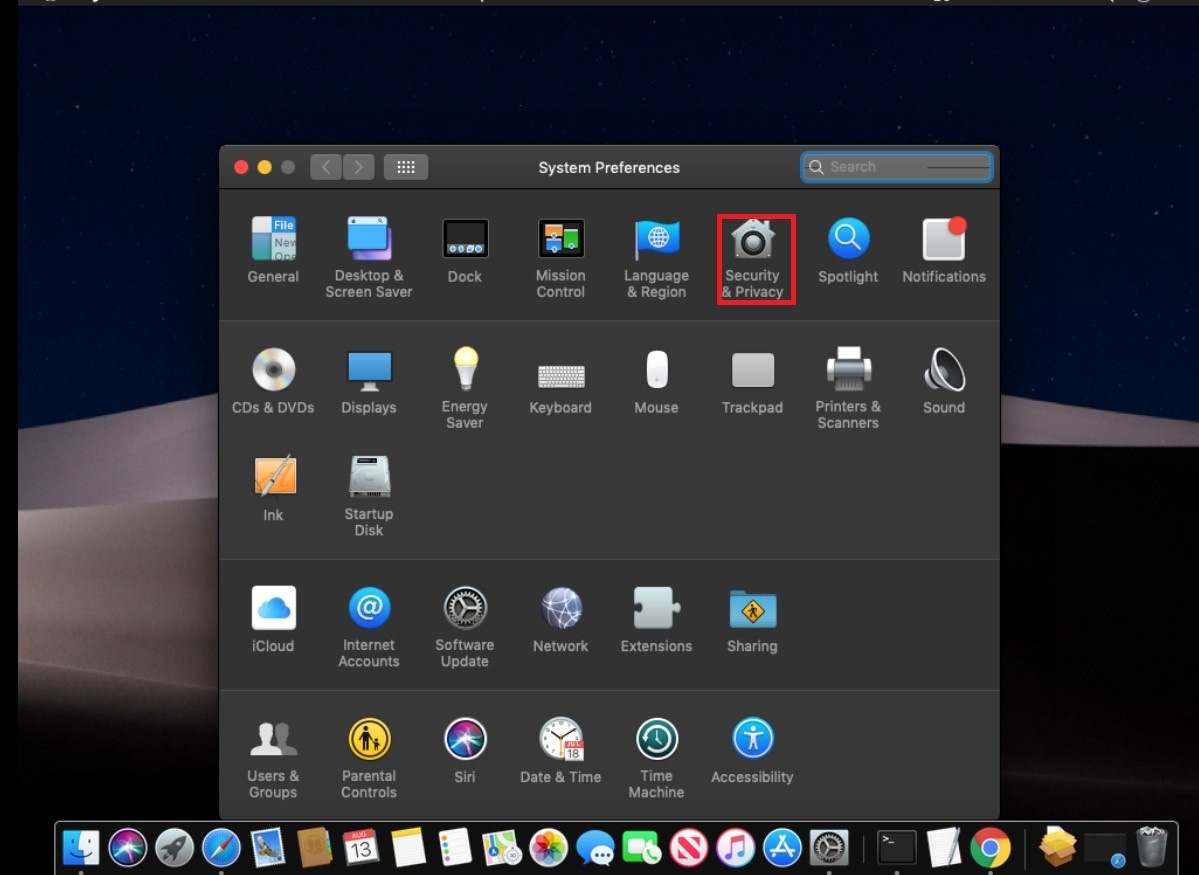
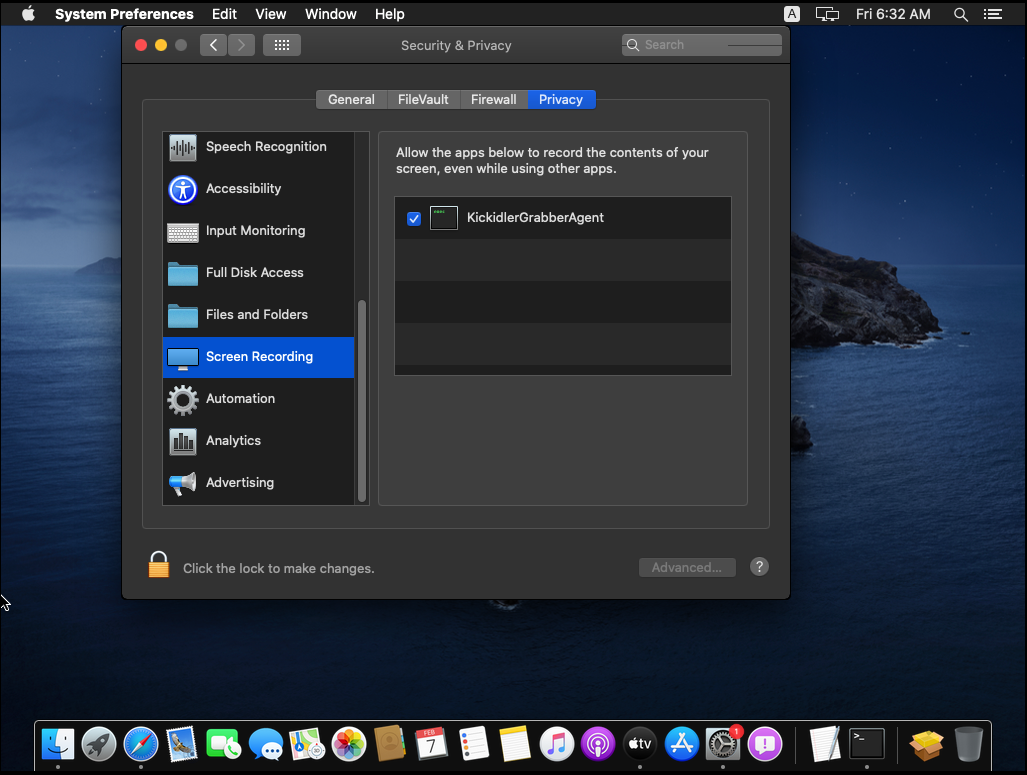
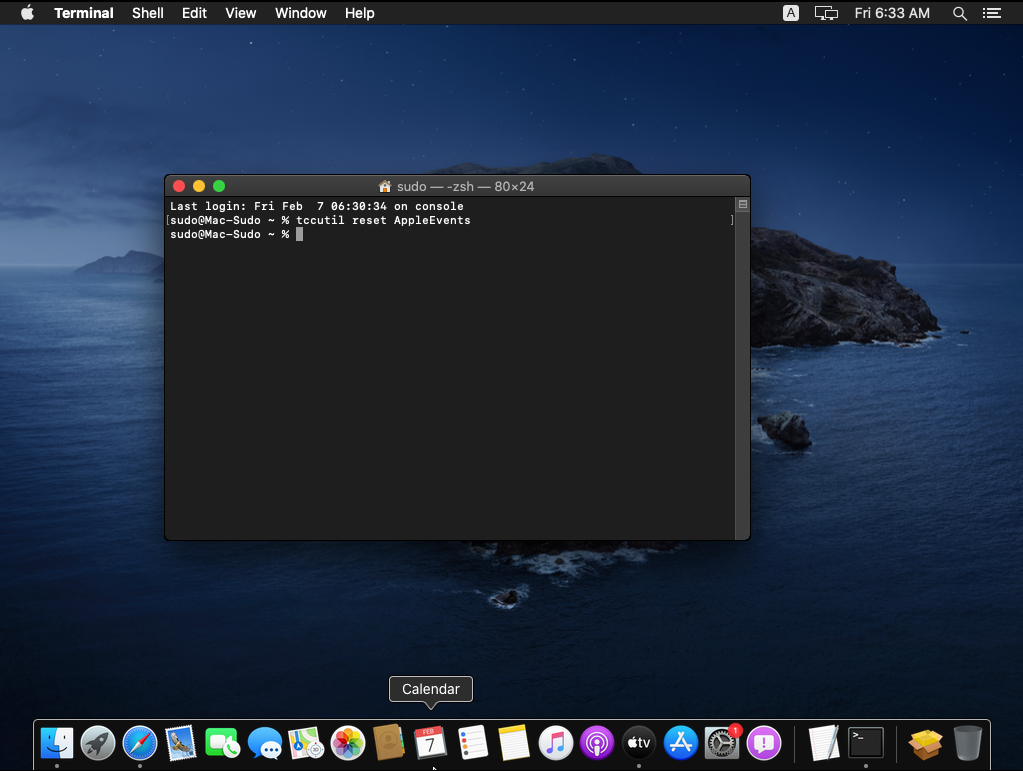
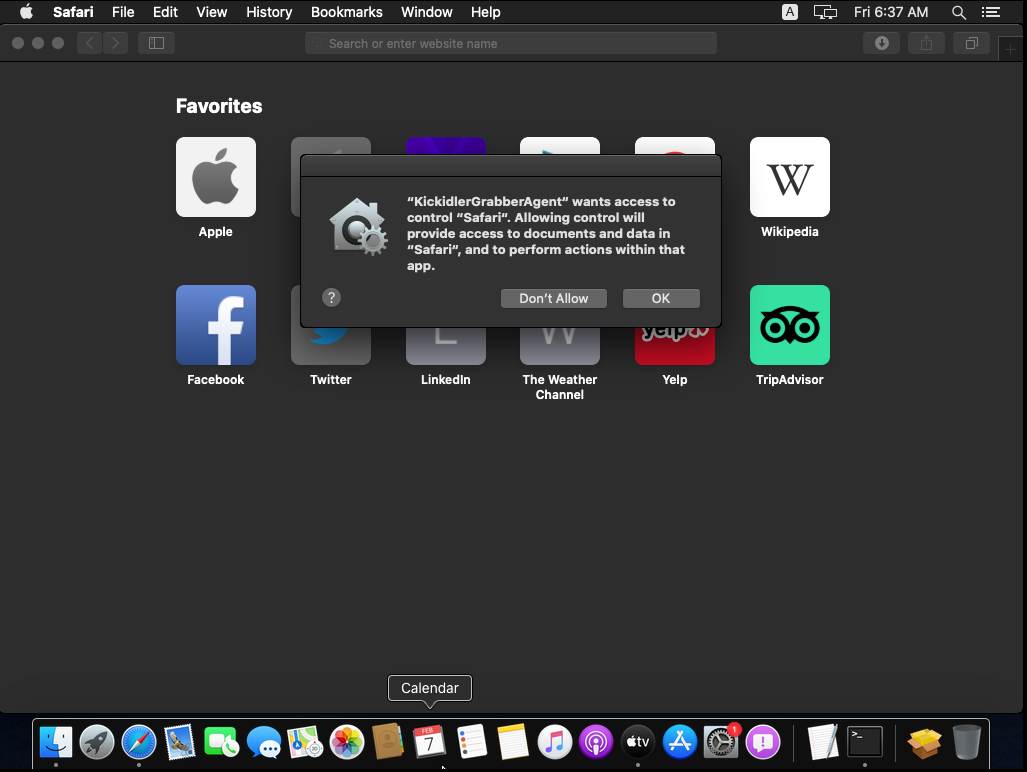
To install an application that was downloaded from somewhere other than the AppStore, you need to confirm the installation in the Security & Privacy section. To confirm the installation, do the following:

  1. After downloading the app, launch it. A warning regarding the presence of malware or the inability to verify the developer will appear on the screen.
  2. Then open System Preferences and go to Security & Privacy.
  3. Unlock the interface in the General tab. To do this, click the lock and type in your password. Next, click the Confirm login button.
  4. In the subsequently opened window click the Open button to start the application installation.
     

1. Open a command prompt
2. Select the directory where the installation file is located
3. Run the distribution kit with the command msiexec /i

Use the instruction presented here to install Kickidler software components.
Use the information below, when servicing components.
 
For Server
 
Server logs are located here by default:
/opt/KickidlerNode/log/

/opt/KickidlerNode/log.old/ — rotated logs
Server configuration files are located here by default:
/opt/KickidlerNode/config/
 
Use the following commands to work with Server:
# service kickidlernode stop — stop Server
# service kickidlernode start — start Server
# service kickidlernode restart — restart Server
# service kickidlernode status — chech Server status

For DB PostgreSQL

PostgreSQL logs are located here by default:

/var/log/postgresql

Use the following commands to work with DB:

# service postgresql stop — stop DB
# service postgresql start — start DB
# service postgresql restart — restart DB
# service postgresql status — check DB status

For Grabber

Grabber logs are located here by default:

/opt/TeleLinkSoftHelper/log

/opt/TeleLinkSoftHelper/log.old — rotated logs

Grabber configuration files are located here by default:

/opt/TeleLinkSoftHelper/config/

Use the following commands to work with Grabber:

# service kickidlergrabber stop — stop Grabber
# service kickidlergrabber start — start Grabber
# service kickidlergrabber restart — restart Grabber
# service kickidlergrabber status — check Grabber status


For Viewer

Viewer logs are located here by default:

/opt/KickidlerViewer/log/

/opt/KickidlerViewer/log.old/ — rotates logs

Viewer configuration files are located here by default:

/opt/KickidlerViewer/config/

Attention! The instruction can be used only if you are going to transfer the database between computers with the same digit capacity.

Do the following actions to transfer Data Server to another local disk or another computer:

  1. Disable nns service (Start\Control Panel\Administrative Tools\Services).
  2. Make sure that there are no running postgres.exe processes. If there are any running processes, they must be terminated by the command via command prompt (processes must be checked in task manager).
C:\Program Files\KickidlerNode\pgsql\bin\pg_ctl.exe stop -D C:/Program Files/KickidlerNode/pgsql/data -m fast -w
  1. Copy data folder, containing the database (data folder is located here by default: C:\Program Files\KickidlerNode\pgsql).
  2. Delete Server by standard means (using deletion or modification of programs).
  3. Install Server to new directory or another computer (it is necessary to select the directory in Roman alphabet during the installation).
  4. Wait 5 minutes after installation, disable nns service and make sure that there are no any running postgres.exe processes.
  5. Replace data folder in the installed directory with the one you copied in step 3.
  6. Start nns service.


Do the following actions to free up the space on Server.

1. Disable nns service (Path: Control Panel\Administrative Tools\Services),

2. Open administrator command prompt,

3. Run PostgreSQL using the command

"C:\Program Files\KickidlerNode\pgsql\bin\pg_ctl.exe" start -D "C:/Program Files/KickidlerNode/pgsql/data" -w -o "--logging-collector=on --log-destination=stderr --log-directory=pg_log --log-filename=ipg-%a.log --log-truncate-on-rotation=on --log-rotation-age=1d --log-line-prefix=\"%m \" --log-timezone=\"Europe/Moscow\" --log-statement=ddl --log-connections=on --log-disconnections=on --listen-addresses=127.0.0.1 --port=5439 --max-connections=100 --shared-buffers=262144kB --wal-buffers=5242kB --effective-cache-size=734317kB --work-mem=7811kB --maintenance-work-mem=39059kB --checkpoint-segments=64 --checkpoint-completion-target=0.9"

4. Connect PostgreSQL using the command

"C:\Program Files\KickidlerNode\pgsql\bin\psql.exe" -h 127.0.0.1 -p 5439 -U kickidler_node

5.Check the video amount using the query

 select pos::date, pg_size_pretty(sum(octet_length(data))) from video_frame group by pos::date;

6.Delete the video using one of the following methods.

a)Deletion of all videos

Run the following commands to delete all videos:

truncate video_frame;
truncate video_sequence;

If errors appear after the command execution, repeat the query, inserting cascade word at the end.

b) Deletion of all videos for specific period

Run the following commands to delete data for specific date.

Display dates, for which there is video in the database:

select pos::date from video_frame group by pos::date;

Delete video for specific date:

delete from video_frame
WHERE pos::date = '20160523';

delete from video_sequence 
WHERE first_frame_pos::date = '20160523';

Delete video for several different dates:

delete from video_frame 
WHERE pos::date = '20160523' OR pos::date = '20160524' OR pos::date = '20160525';

delete from video_sequence 
WHERE first_frame_pos::date = '20160523' OR first_frame_pos::date = '20160524' OR first_frame_pos::date = '20160525';

Delete video for specific period:

delete from video_frame
WHERE pos::date >= '20160523' AND pos::date <= '20160525';

delete from video_sequence
WHERE first_frame_pos::date >= '20160523' AND first_frame_pos::date <= '20160525';

where 20160523 is the date, for which you want to delete the video (in YYYYMMDD format) 

c) Deletion of all videos for specific user

Run the following commands to delete data for specific user.

Display the list of user names-domain-computer name and video amount for them

SELECT online_session.user_name, online_session.user_domain, online_session.computer_name, pg_size_pretty(sum(octet_length(data))) 
FROM video_frame 
JOIN video_sequence ON (video_sequence.id=video_frame.sequence_id) 
JOIN online_session ON (video_sequence.online_session_id=online_session.id) 
GROUP BY online_session.user_name, online_session.user_domain, online_session.computer_name
ORDER BY sum(octet_length(data)) DESC;

Delete the employee’s video

DELETE FROM video_sequence WHERE id IN(
 SELECT vs.id FROM video_sequence AS vs
 JOIN online_session AS s ON(vs.online_session_id=s.id)
 WHERE
 s.user_name='Эдуард' AND
 s.computer_name='win10x64' AND
 s.user_domain='workgroup'
 LIMIT 100
);

Here s.user_name is the user name, s.computer_name is the computer name, s.user_domain is the domain name, for which you want to delete the video. If some of the parameters do not exist, leave them blank in the query. The limit of operations (Limit=100) is also displayed and can be changed if necessary.

7.Execute the command of quick space clear after completing commands of deletion.

vacuum full;

When you install and run the software package components, you must have TCP access on:

  • my.kickidler.com:40401.

By this address the following is delivered 

  • key activation check,
  • license check,
  • Central Server address check.

Yes, you can. Program is installed in the local network by default. If you want to install program outside office, read an article “Settings for heterogeneous networks”.

Information about server load has been collected.

Server:  Gigabyte Technology Co., Ltd., H57M-USB3
Intel(R) Core(TM) i5 CPU 650 @ 3.20GHz, 4 cores

Speed of video recording: frames/sec​

Database

Disk space, for employee per day Flow of network traffic, for employee Average CPU load
  PostgreSQL                       ~  1,2 Gb                  ~120 Kb/sec                 10%


Server: Virtual Machine, Hyper-V
Intel(R) Xeon(R) CPU E5-2630 v2 @ 2.60GHz, 6 cores

Speed of video recording: 1 frames/min
Database            Disk space, for employee per day Flow of network traffic, for employee Average CPU load
     PostgreSQL     ~  190 Mb ~35 KB/sec 7%
 

The local license server was developed for customers who cannot use the Internet for work program.

The local license server is supplied as a programm for OS Linux with keys for activation.

The program must be installed on a computer with 64-bit architecture.

The computer, on which you will unfold your local server,  needs at least 2GB of RAM.

Detailed information about restrictions, purchasing and using a local version of a program complex Kickidler You can learn in the Sales Department: sales@kickidler.com.

Most likely the crash happens due to the Nouveau driver for the graphics card.

Install the proprietary NVIDIA driver to resolve this problem. NVIDIA driver you can download here.

You can find up-to-dated activation key for installation of software components in Personal Account.

To do this it is necessary:

  1. To login to Personal Account (login and password for authorization are specified in the letter when registering on the site),
  2. In Settings section click on the button "Activation key and setup files" and copy activation key.

Click Download keys button to download full list of keys.

We recommend that our clients notify their employees about the monitoring and sign an addendum.

However, sometimes circumstances arise when you need to monitor an employee's PC discreetly. For such cases, our program provides a covert installation option. To ensure that the employee won't be able to detect Kickidler in the task manager, you need to select the "Hidden mode" option. Once this option is selected, Grabber will be hidden from the launched processes.

You can read more about covert installation here.

The following licenses are currently available for the software:

  • Demo — a free license with no limit on the term of validity. Corresponds to the Demo software mode. It is issued automatically if the user doesn't have any other licenses.
  • Trial — a free license with a limited term of validity. Can be used with Employee Monitoring (EM) or Time Tracking (TT) operating modes. It is issued automatically in order to test the software.
  • Term-restricted — a paid-for license with a limited term of validity. Can be used with Employee Monitoring (EM) or Time Tracking (TT) operating modes.
  • Perpetual — a paid-for license with no limit on the term of validity. Can be used with Employee Monitoring (EM) or Time Tracking (TT) operating modes.

Based on the licenses assigned to the grabbers, the software can operate in the following modes:

  • Demo — a limited operating mode that enables online video monitoring in the viewer for a limited number of employees as well as the Central Server for managing the settings.
  • Employee Monitoring (EM) — a full-featured operating mode with no restrictions.
  • Time Tracking (TT) — a simplified operating mode that is used mainly for working with reports. All functionality is available, except for the features used for working with videos, the Viewer applications, and the related settings on the Central Server.
  • Mixed type - using Employee Monitoring (EM) and Time Tracking (TT) licenses simultaneously. In this case, the grabber to which the Time Tracking (TT) license is assigned will not capture videos, keystrokes, and will not be remotely controlled.

There are several ways to pay for Kickidler licenses:   

  • Payment via YuKassa online payment system (bank cards, YooMoney, SberPay, QIWI Wallet, WebMoney and other payment options).
  • Payment by invoice.

By selecting to pay by card, you will proceed to the payment system. After passing all the payment steps, you will return to your Kickidler profile. In the case of successful payment, the licenses will be added, and you can activate them on the “License” page.
In order to pay by invoice, you need to fill in your billing information. The system then generates the invoice for payment for the order. The invoice can be downloaded directly upon order confirmation or later in the “Payments” page in Personal cabinet. 
After paying the invoice, the funds will be credited to your balance in Personal cabinet, and you can pay for your order on the “Orders” page. If you choose “Pay automatically” upon ordering, the system will pay for the order when you receive funds on your account.
The full package of documents for the purchased licenses will be generated within a few hours after the payment. You can download them from the “Orders” page.

Enter the “Prices” section of your Personal Cabinet. There you will see a table of prices for licenses. The more licenses you purchase, the cheaper will be the cost of 1 license.
Licenses can be purchased for a month or a year. Select the desired value to the right of the entry field. By clicking “Purchase a license” button, you will be taken to the order page. Check the order content and confirm the purchase.
The order is confirmed; a serial number is assigned to it. Such an order will be added to the page of your orders.
Now you can pay for your order.

Do the following actions to activate the purchased licenses:

  1. Login to Personal Account.
  2. Go to Licenses section.
  3. In opened table tick boxes located opposite grabbers, for which you want to activate licenses.
Attention!

You can activate licenses only for grabbers with the following statuses:

  • EXPIRED
  • DEMO (the grabber is in demo mode with limited functionality)
  • TRIAL (the grabber is in test mode with full functionality)
  1. Click Renew license button. New window will display a table, listing all grabbers, for which you can activate licenses.
  2. Under the table, select the type of licenses, which you want to activate for grabbers.
  3. Click «Renew» button.

If you do not have enough purchased licenses for all selected grabbers, you can purchase them or reduce the list of grabbers.

After activation of licenses the status of grabbers will change to NEW, and the period, during which the license will be active for the grabber, will be set in Validity period column.

Attention!

The licenses for grabbers can be renewed automatically. In this case, the purchased licenses will be automatically activated for grabbers after expiration of their licenses.

The license transfer is useful in the following cases:
  1. there is no more need to monitor the computer
  2. the computer, on which the grabber was installed, is broken
  3. Therefore, you can transfer the license in order not to lose the paid days.
 
Do the following actions to transfer the license:
 
  1. go to Licenses section
  2. select the grabber, from which you want to transfer the license, in the table
  3. click Swap license button.
  4. select the grabber, to which you want to transfer the license, from the list in the opened window 
  5. click Swap button.
After transferring the license, the status of the grabber, from which the license was transferred, will be changed to EXPIRED (this means that the license has expired). If you no longer plan to use this grabber, we recommend you to disable its activity so that it does not interfere with further work.

Private Cabinet is for

  • Buying and managing of licenses,
  • Keep a valid activation key,
  • Changing the Central Server.
There are two ways to change the password for personal account
 
First method
 
When you logging to Personal Account, click «Forgot your password?» button and enter your email, to which you will receive further instructions on changing the password.
 
Second method 
 
1. Login to Personal Account,
2. Go to Details section. To do this, click on the mail in the upper right corner of the interface,
3. Click Change Password button on Details tab,
4. Fill in Current password, New password and Re-enter new password fields,
5. Click Save button.

To check the VAT number in your account, you should use VIES (VAT Information Exchange System) service.

If you’re placing an order and your account indicates that the VAT number is incorrect and you can’t make the order, follow these steps:

If you need assistance with your order, please contact us at sales@kickidler.com, +7(495)777-54-58.

Do the following actions to change the password to enter Central Server web-interface:

  1. Access the web interface of the Central Server
    1. To do this, open your browser and type this type of address into the address bar:
http://%IPv4 Central Server address%:8123
Example: http://192.168.0.100:8123.
  1. Enter your login and password for the web interface
    1. Default login and password: admin admin.
  2. Go to the "Accounts" subsection of the "Configuration" section using the side menu.
  3. In the table, select the account for which you want to change the password and click the "Edit account" button.
  4. Enter the password, repeat the account password and click OK.

In order to see employees in the Viewer, follow these steps:

  • In Central Server web interface open section “Employees”,
  • Open subsection “Viewers coordination”,
  • Choose the viewer whose department or employee monitoring settings need to be changed,
  • In a chart cell choose the needed monitoring setting.

If Viewer is attached to parent department, you can see employees of all child departments in the Viewer too.

In order to hide deleted program components, follow these steps

  • In Central Server web interface open section “Components and coordination”,
  • Choose type of components for hiding (Grabbers, Viewers or Servers),
  • Find in the table component for hiding,
  • Click the button “Turn off activity”,
  • Click the button “Save”.

Attention!

Program component becomes inactive automatically by these rules:

  • For Viewer: if it doesn’t run during a week,
  • For Grabber: if it has not license (demo, trial, purchased) and doesn’t run during a week,
  • For Server: it’s not a Central Server, it has not any attached Grabbers and it doesn’t run during a week.

Activity of a program component will turn on automatically, if you

  • Run Viewer,
  • Set license to Grabber (demo, trial, purchased),
  • Set centrality to Server.

All new Grabbers are attached to the Central Server automatically.

In order to attach Grabber to Server, follow these steps:

  • Open Configuration section on Central Server side menu
  • Select Component and coordination section
  • Click on the Grabber section
  • Change Server to selected Grabbers 
  • Click the button ‘Ok”.

In order to see, on which computers program components have been installed, follow these steps:

  • In Central Server web interface open section “Components and coordination”,
  • Open subsection Viewers, Grabbers or Servers,
  • Look at the table.

Up-to-dated computer names are located in column “Computer name”.

Attention!

Only active components are displaying in table by default.

In order to rename program component (Server, Grabber or Viewer), follow these steps:

  • In Central Server web interface open section “Components and coordination”,
  • Open subsection Viewers, Grabbers or Servers,
  • Find a component in the table,
  • Click the button “Edit”,
  • Enter new name,
  • Click the button “Save”.

The default settings for each server are as follows:

  • 3 years as a period of history storage on the Server,
  • 7 days as a period of video storage on the Server,
  • 1 FPS as video capture rate,
  • Maximum speed of receiving data from Grabbers’ cache is without restrictions.

In order to change settings for Server, follow these steps:

  • In Central Server web interface open section “Components and coordination”,
  • Open subsection Servers,
  • Find Server in the table,
  • Click the button “Edit”,
  • In opened window enter new settings,

Click the button “Save”.

In order to see, to which Server Grabber has been attached, follow these steps:

  • In Central Server web interface open section “Components and coordination”,
  • Open subsection Grabbers,

In the column “Grabbers server name” you can see Server name of a Grabber.

You can attach a Grabber to another Server in the “Grabber” subsection of the “Components and coordination” section.

Contents