 English
 Русский
 Português
 Español
 Հայերենով
 Türkçe
 Български
 中文
中文 ქართული
 Français
 日本語
日本語 Қазақ
Қазақ- Organization structure
- Sessions
- Productivity
- Calendar
- Monitoring settings
- Options to display settings
- Displaying settings as a List
- Displaying settings as a Table
- Managing settings
- Monitoring settings' impact on program functionality
- Kickidler self-control
- Automatic notifications
- Distributing User Accounts
The “Employees” chapter helps controlling stuff, dealing with organization tree. All the stuff dealing with the organization tree possesses an inheritance mechanism.
All the affiliated organization tree element inherit parental settings, unless they have their own settings assigned. E.g., an employee will get the same calendar settings as of the department calendar. However, whenever an employee’s calendar undergoes personal changes (a sick leave), the department calendar will ignore this day.
“Employee” section includes the following subsections:
- “Structure organization” section helps to customize and manage organization structure.
- “Sessions” section is necessary to control employee’s sessions.
- “Productivity” section helps to evaluate the effectivity of applications and web sites employees use.
- “Calendar” section helps to manage the organization, divisions and employees production calendar.
- “Monitoring settings” section helps configure Viewers that monitor departments and employees as well as manage data collection from them.
- "Kickidler self-monitoring" section is required to control the employee’s self-monitoring interface.
- "Automatic notifications" section is intended for applying created automatic notifications to employees.
- "Distributing user accounts" section is intended to configure employee visibility for the Central Server accounts,
Switching subsections is available on the upper navigation panel in the “Employees” section.
Organization structure
The “Organization structure” section helps to adjust the company organization tree, including creation, changing and removing employees and divisions.
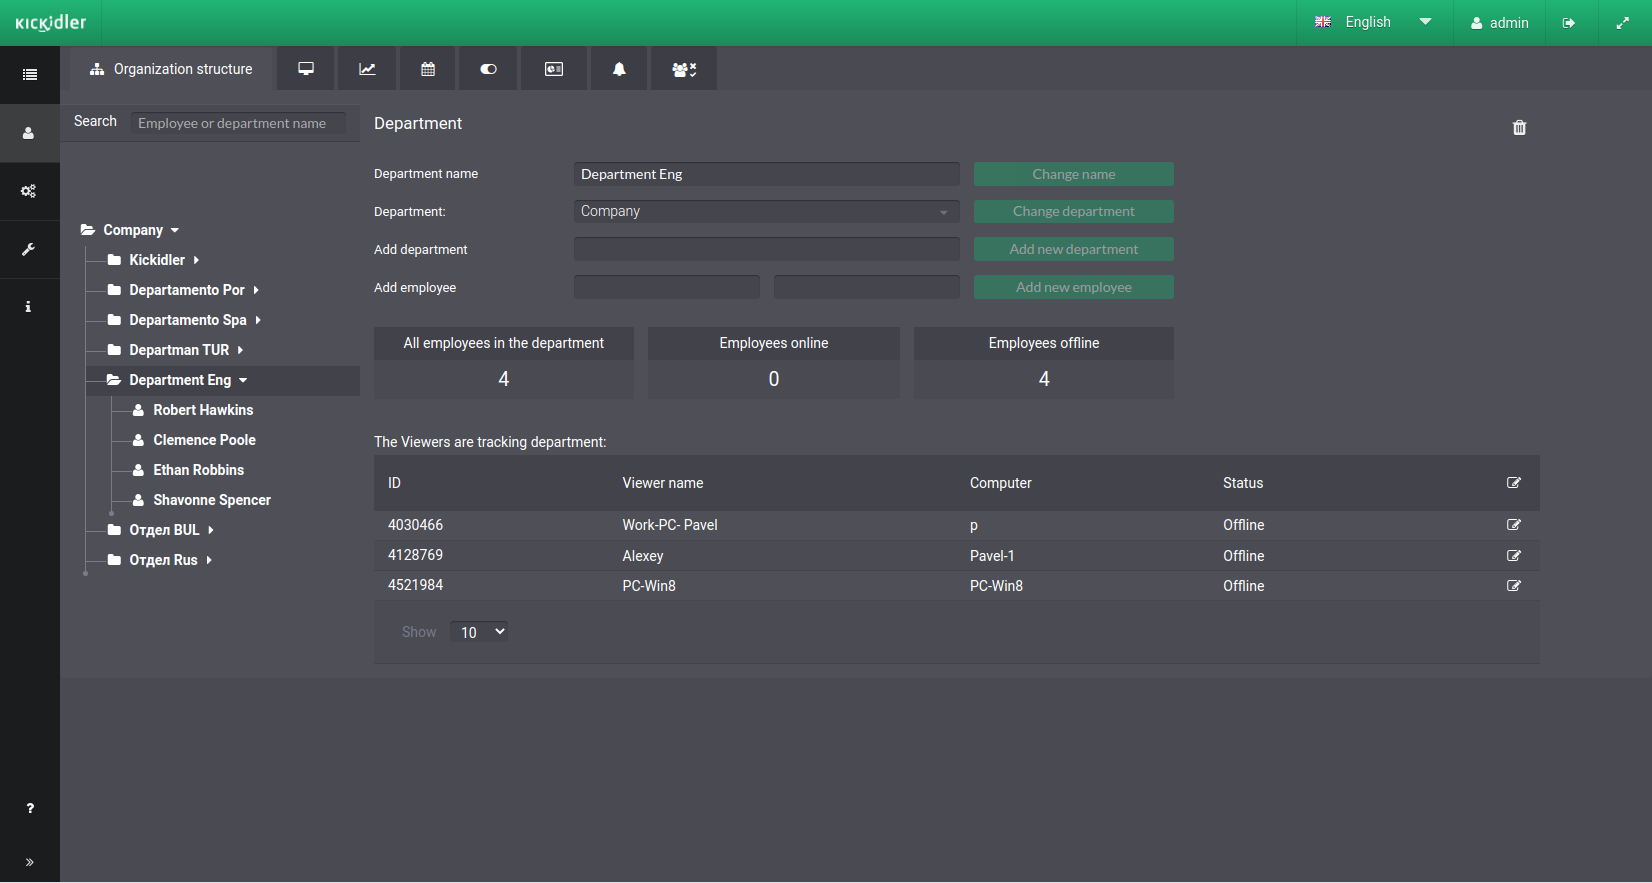
The “Organization structure” section lets a user see the overall information on users of every division, their sessions and the list of tracking viewers.
In this section a user may:
- Navigate through the organization tree
- Choose the needed organization tree elements
- Move organization tree elements
- Add / remove / edit employees
- Add / remove / edit divisions
Warning!
1) If you have an Active Directory in the organization, an employee list will load automatically on se up stage. Department division will correspond to the active directory parameters.
2) Divisions of the kind will need to adjust employee visibility settings for the Viewers.
If an organization does not have the Active Directory structure, all the employees will attach to the default department.
Different organization tree elements
By default, an organization tree includes the following elements:
- The whole organization – a parental section for the whole organization structure. It may include only other departments, hence no employee can be created within this section, and it can’t be deleted.
- A default section – the first automatically created section in organization structure. It may include other sections and employees. All the new employees are added to this section, hence it can’t be deleted.
- Section – a simple section created in organization structure. It may include other sections and employees.
- Employee – an element in organization structure, denoting a certain supervised employee.
Managing departments
Adding a new department in the organization structure:
- Choose a department in organization structure you need to create a new department in,
- Type the name of a new department,
Press the “Add new department” button.
Moving department:
- Choose a department in organization structure you need to move
- Use a mouse cursor to drag it into another place.
Or
- Choose a department in organization structure you need to move
- From the droplist, select the department to which you need to move the department
Press the “Change department” button.
Editing department name:
- Choose a department in organization structure you need to rename,
- Rename it
Press the “Change name” button.
Removing department:
- Choose a department in organization structure you need to remove,
- Press the “Remove department” button
- Press the “Remove” button in a pop-up window.
Warning!
Removing a parental department will remove all the affiliated departments as well.
Managing employees
Adding an employee to a department:
- Choose a department in organization structure you need to create a new employee in,
- Type an employee’s first and last names,
Press the “Add new employee” button.
Moving an employee:
- Choose an employee in organization structure you need to move,
- Use a mouse cursor to drag him into another place.
Or
- Choose an employee in organization structure you need to move
- From the droplist, select the department to which you need to move the employee
Press the “Change department” button.
Editing an employee:
- Choose an employee in organization structure you need to edit,
- Edit the employee’s first and last names,
Press the “Edit Employee” button.
Removing an employee:
- Choose an employee in organization structure you need to remove,
- Press the “Remove employee” button,
- Press the “Remove” button in a pop-up window.
Warning!
It’s impossible to completely remove employee data. When removing an employee from the organization structure, all his sessions will move to the “Free sessions” chart in the “Sessions” section where you may continue managing them.
Sessions
The “Sessions” section helps to manage the links of employees with user PC sessions.
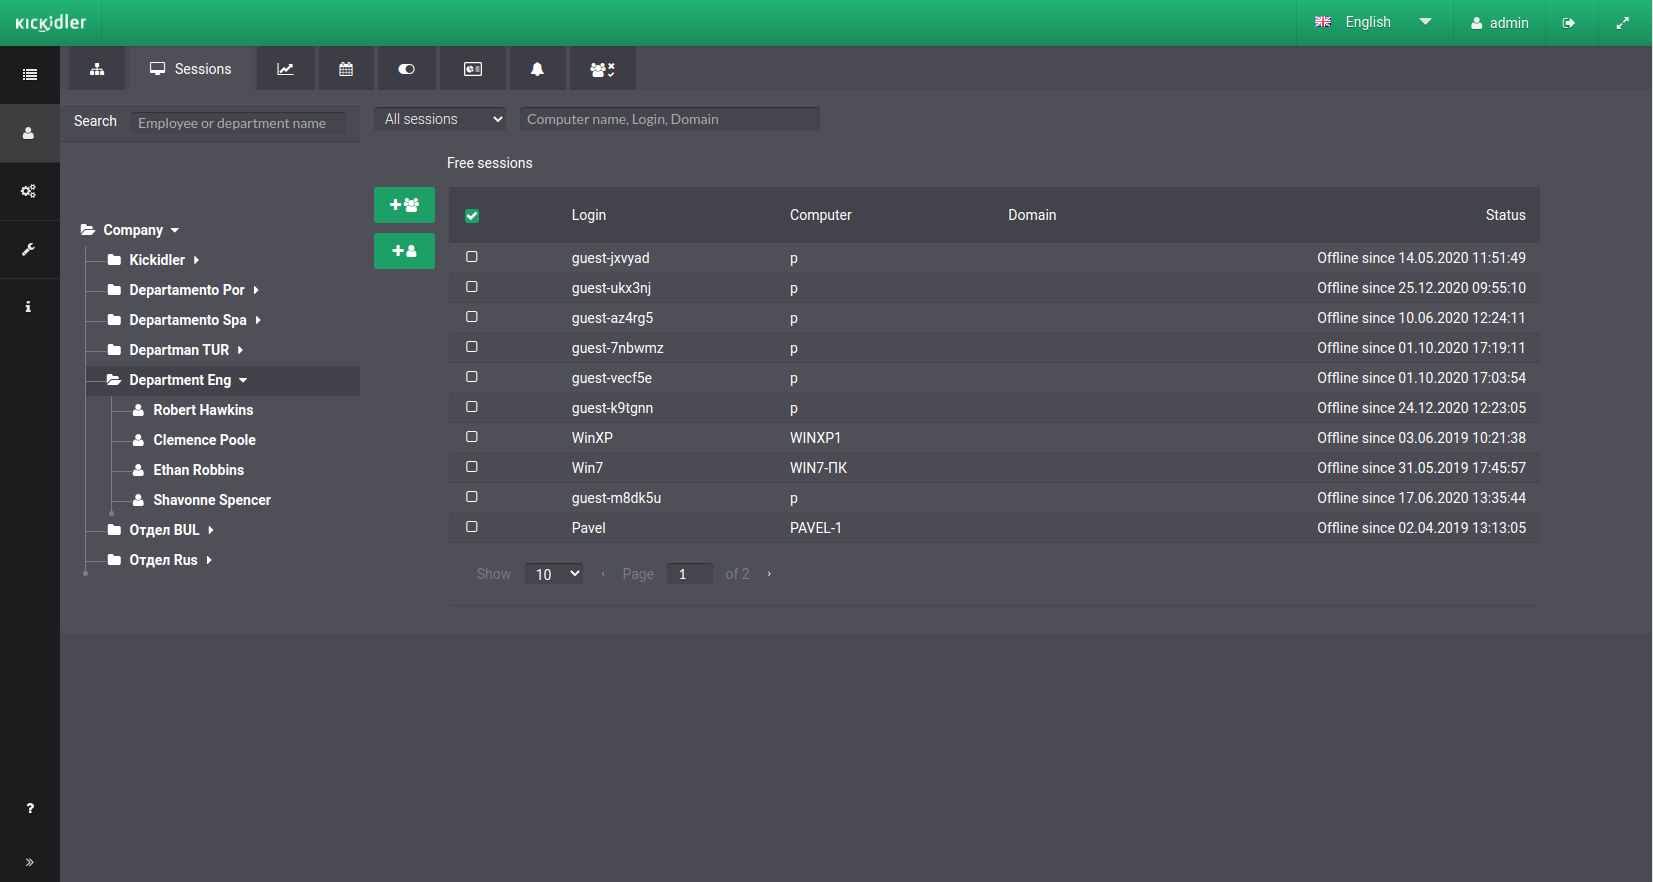
The “Sessions” section includes all the free user sessions, disconnected from an employee by various reasons, and designated employee sessions.
In this section a user may:
- Navigate through the organization tree,
- Choose organization tree elements,
- Navigate through the sessions list,
- Create one new employee from various chosen sessions,
- Create various employees from various chosen sessions,
- Manage employee sessions,
- Manage session activities.
Creating employees from free sessions:
The section enables a user to create new users from free sessions.
Creating one employee from free sessions:
- Choose a division in organization structure where you need to create an employee,
- Choose the needed sessions in the “Free sessions” chart you need to create n employee from,
- Press the “Add employee to department” button.
In a pop-up window, edit an employee’s first and last names if needed, correct the list of chosen sessions and press the “Create” button. Employees created from the chosen sessions will display in the organization structure.
Creating many employee from free sessions:
- Choose a division in organization structure where you need to create an employee,
- Choose the needed sessions in the “Free sessions” chart you need to create n employee from,
- Press the “Add employees to department” button.
In a pop-up window, edit an employee’s first and last names if needed, correct the list of chosen sessions and press the “Create” button. Employees created from the chosen sessions will display in the organization structure.
If you have an Active Directory set up in your company, newly created employees will form automatically according to the Active Directory structure. All the other employees from user sessions will be created automatically in a department by default.
Managing employee sessions
The “Sessions” section enables the user to manage the employee linked sessions, namely to add and remove sessions.
Adding and removing an employee’s session:
- Choose an employee from the organization structure whose sessions list you need to edit,
- In the “Employee sessions” chart press the “Remove session from employee” button to unlink the session from the employee.
- In the “Free sessions” chart press the “Add session to employee” button to link it.
To manage a large number of sessions, press the “Remove all sessions from employee” or “Add all sessions to employee” buttons.
Warning!
Information is not recorded from sessions that are not assigned to employees. When you delete a session, the employee also stops recording any information from that session.
Productivity
The “Productivity” section is designed to administer efficiency ratings and add new rated applications.
The section has two subsections:
- Efficiency ratings — a subsection that's essential for administering existing efficiency ratings.
- Add/Import ratings — a subsection needed to add new applications with their ratings to the program.
You can do the following in both subsections:
- navigate the organization tree,
- choose the organization tree element for which the settings will be applied.
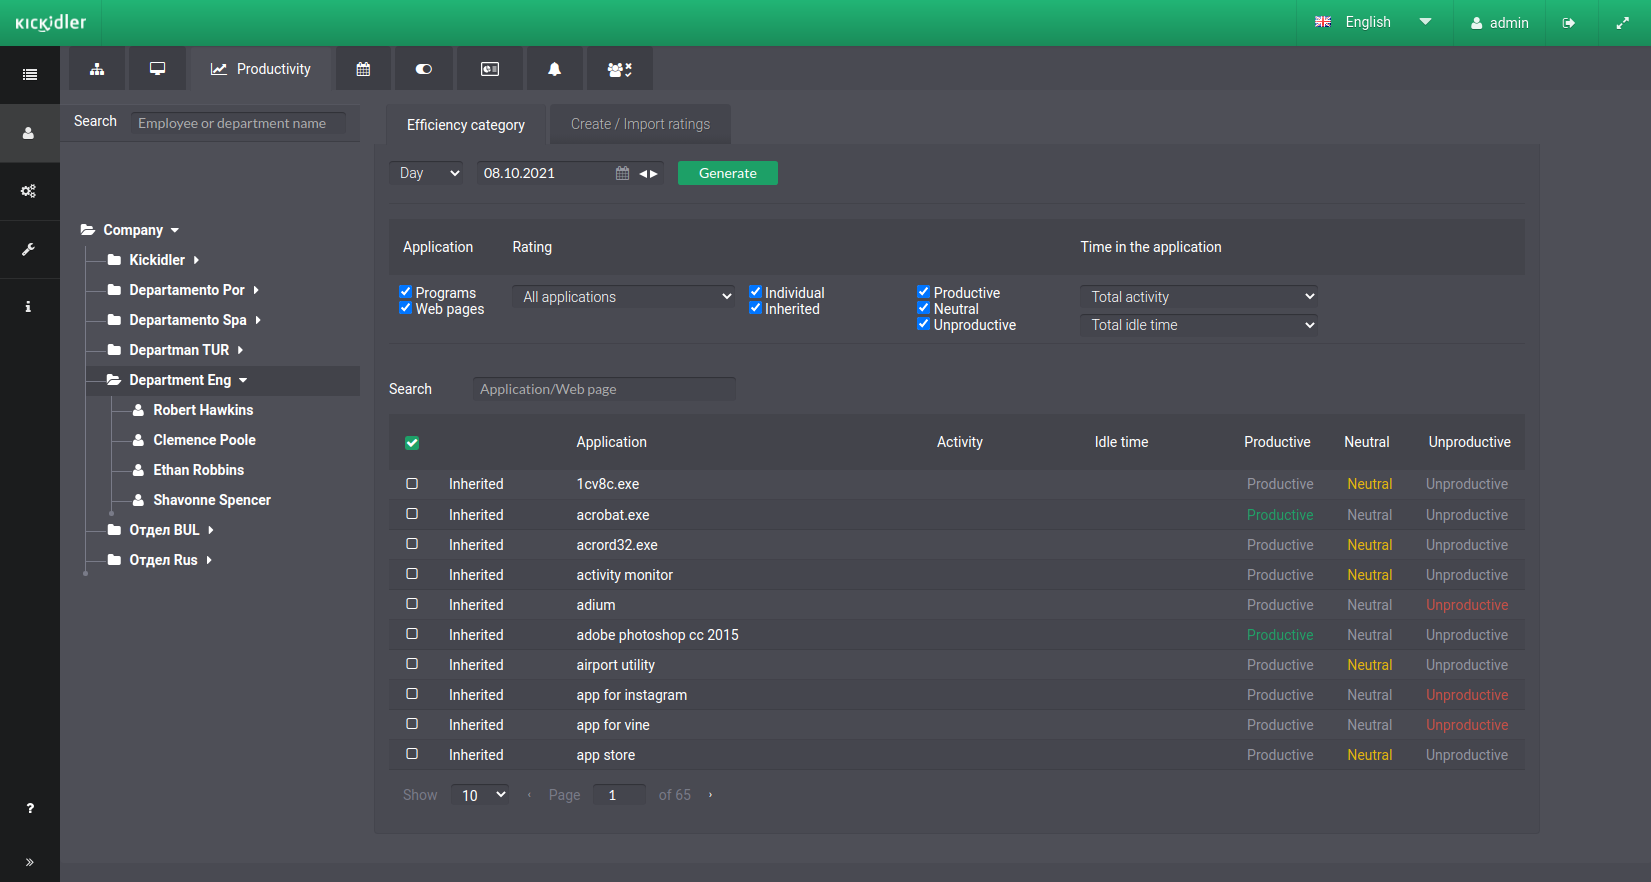
Efficiency ratings
There is a table in the subsection that contains the following information:
- List of the applications that are available in the program,
- Time of usage of these applications,
- List of applications ratings.
By default, this subsection displays all applications with ratings but without the indicators of activity or inactivity.
There are also filter options and a set of features for administering the ratings here.
You can do the following in the Efficiency ratings subsection:
- request the time of activity and inactivity of applications,
- filter the list of applications and ratings,
- search for applications,
- delete and edit existing application ratings.
Rating categories
The program has three available rating categories for the applications:
- productive,
- neutral,
- unproductive.
Ratings that were received by a department — or ratings an employee received from a department that's higher in the organization tree — are displayed with the "Inherited" parameter.
Personal ratings that were assigned to an employee or department directly are displayed in the list with the "Individual" parameter.
Applications that do not have individual or inherited ratings by default become applications without ratings.
Administering the list of applications and efficiency ratings
To see the time that was spent in the applications:
- Select a department or an employee in the organization structure,
- Specify the settings of the period for which you want to display the time of activity and inactivity,
and click the "Create" button.
The table will then display information about the activity and inactivity time for each application that was used by the selected tree element for the specified period. The inactivity of an application indicates that this application was not used by the selected employee or by the department during the specified period.
To filter the list of applications and efficiency ratings:
- Select a department or employee in the organization structure,
- Specify the period settings and click the "Create" button,
- Set the required filter parameters:
- By application type:
- Programs,
- Web pages,
- By application usage time:
- Activity,
- Inactivity,
- By availability of rating for the application:
- All applications,
- Applications with rating,
- Applications without rating,
- By rating type:
- Productive,
- Neutral,
- Unproductive,
- By rating inheritance:
- Individual,
- Inherited.
- By application type:
The application list will change depending on the filter parameters you set.
For instance:
If you select the "applications without rating" filter settings, all applications that were used in the specified period but haven't been rated yet will be displayed for the selected tree item. This will allow you to quickly assign these applications a rating.
To search for applications:
- Select a department or an employee in the organization structure,
- In the search box enter the name of a program or a web page.
To edit an existing efficiency rating:
- Select a department or an employee in the organization structure,
- Find the application, the rating of which you want to change,
- Change the rating type for the application in the list by selecting a new category.
Or
- Select a department or an employee in the organization structure,
- Select one or several applications, the ratings of which you want to change, from the list using the checkboxes,
- Change the rating type for the application using the menu above the rating list,t
and click the "OK" button.
To delete an existing efficiency rating:
- Select a department or an employee in the organization structure,
- Find the application, the rating of which you want to delete,
- Click on "delete the rating" icon in the rating list.
After deleting a rating, the application will either get a rating from the higher department or become an application without a rating.
Warning!
You can only delete individual grades.
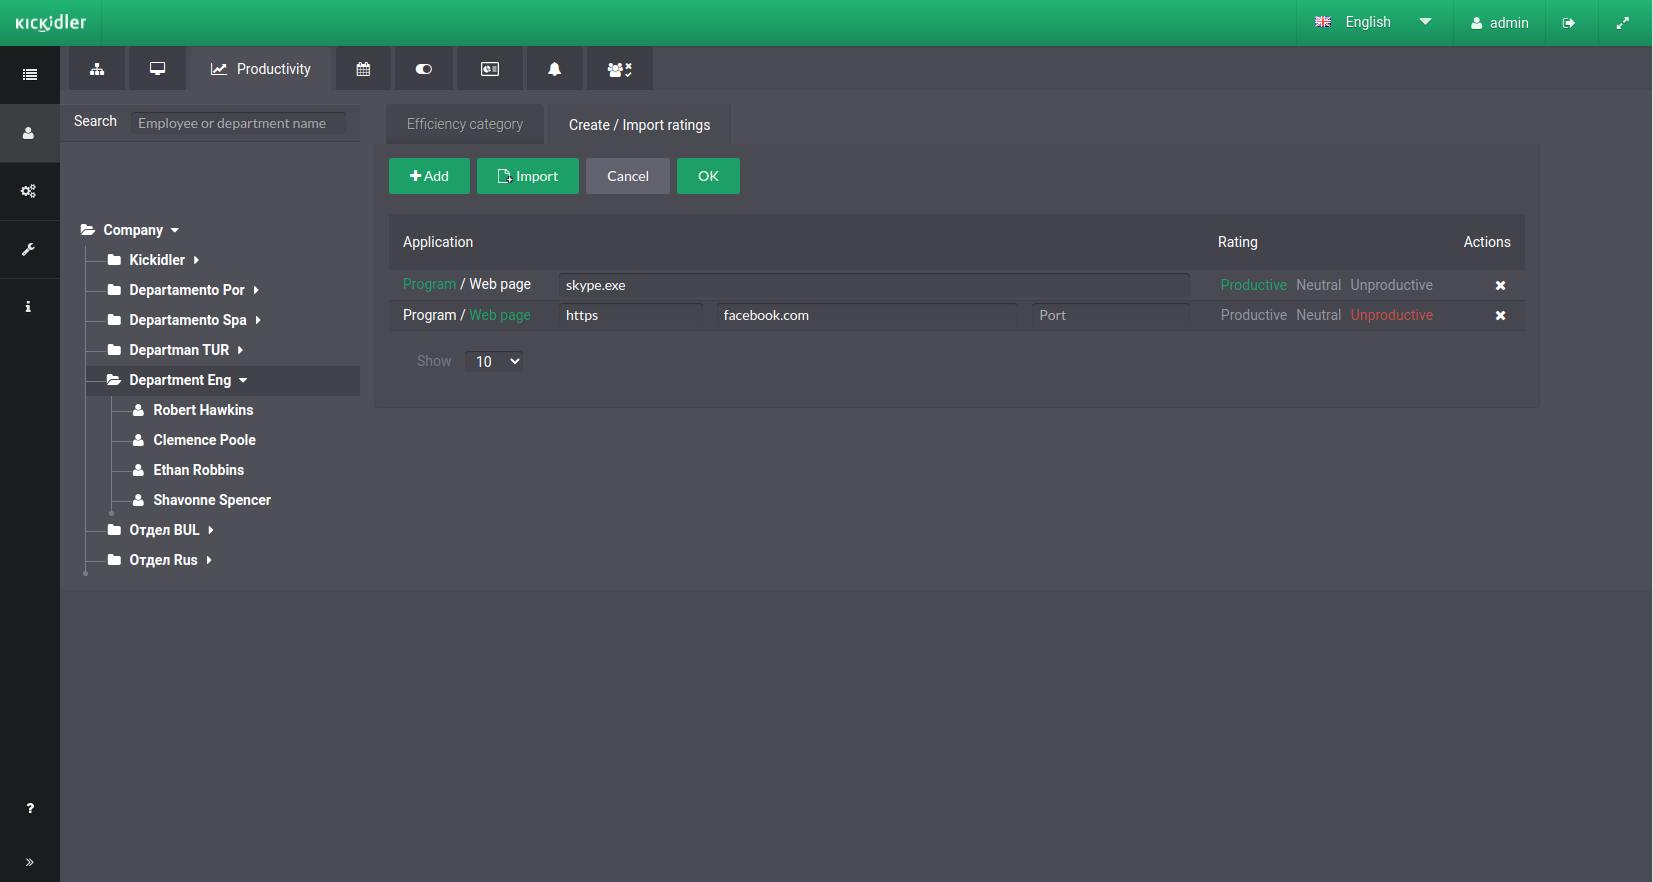
Add/import rating
This subsection has a table where you can add new applications with ratings to the program using import or manual addition via the web interface.
You can do the following in the "Add/import rating" subsection:
- generate a list of efficiency ratings on a case-by-case basis via the web interface,
- import a file with rated applications into the program.
Adding efficiency ratings
To add applications with ratings to the program:
- Select a department or an employee in the organization structure,
- Click the "Add" button,
- Enter the efficiency rating parameters in the table row:
- select the application type (program or web page),
- enter the application parameters (URL for a web page and name of the executable file for a program),
- select rating,
- To add more than one rating, click the "Add" button again and specify the application parameters and the rating,
- Check that the settings you entered are correct and edit them if necessary,
and click the "OK" button.
To import the rating list:
- Create a file according to the protocol of importing the ratings into the program
- Select a department or an employee in the organization structure,
- Click the "Import" button,
- Select the file to import and upload it to the web interface,
- Confirm import into the program,
- Check that the settings you entered are correct and edit them if necessary,
and click the "OK" button.
Once you click the "OK" button, the added ratings will appear in the "Efficiency ratings" subsection in the rating table of the given employee or department.
Warning!
The program provides tips to help you in case of errors when adding or importing ratings:
- Applications and ratings that are set incorrectly will be displayed with an error icon. These ratings will not be taken into account when uploaded to the program.
- Applications and ratings that already exist in the program will be displayed with a warning icon. These ratings will be overwritten.
Protocol of importing the ratings into the program
Import rating file is to be generated taking into account the following requirements:
- Import file should be comprised of rows, where each row contains one application with a rating,
- An example of a file of a suitable format: txt, csv,
- Newline symbol indicates the end of each line,
- One line should consist of three parameters separated by a comma,
- Line format: Application name, Efficiency rating, Application type
- Application name:
- For a program: Name of the executable file
- For a web page: URL
- protocol,
- host,
- port (if necessary),
- Efficiency rating:
- 1 — Unproductive
- 2 — Neutral
- 3 — Productive
- Application type:
- 0 — Program
- 1 — Web page
- Application name:
For instance:
The following lines are specified in the import file:
- skype.exe,2,0
- https://facebook.com,1,1
After import, the program displays these lines in the web interface:
- "program", "skype.exe" with the "neutral" rating,
- "web page", "facebook.com" with an "unproductive" rating.
Calendar
The “Calendar” section allows the user to save and edit employees and departments calendars.
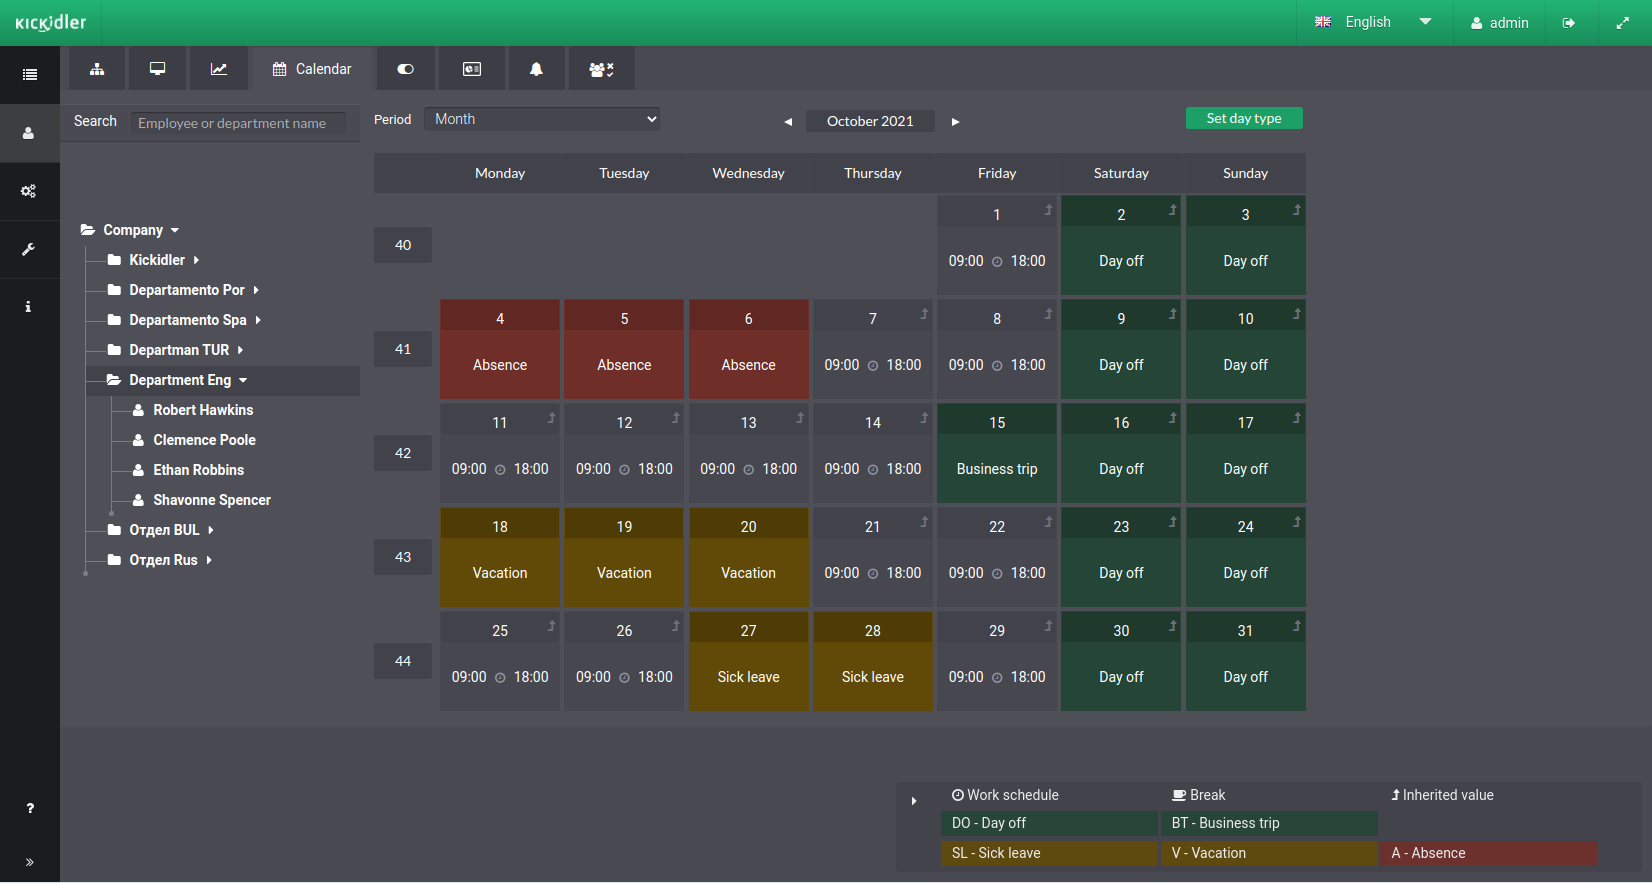
In the “Calendar” contains the information on working schedules and different day types.
The section allows the user to:
- Choose organization tree elements
- Choose days in calendar
- Edit working schedules and calendar day types.
Different day types
The calendar allows assigning the following day types:
- Working day
- Day off
- Absence
- Business trip
- Vacation
- Sick leave
A working day provides schedule and break time.
A day type assigned by a superior department is marked as an inherited. Individual day settings are displayed with no marking.
Default calendar settings are:
- Working days: Monday to Friday 9am to 6pm,
- Weekends: Saturday, Sunday.
Managing calendar
Changing working schedule:
- Choose a department or an employee in the organization structure whose schedule needs to be corrected,
- Choose working days to be changed in a calendar,
- Press the “Set day type” button.
In a pop-up window correct the start and the end time of a working day, a break time if needed and press “Apply” button. Working schedule for the selected employee or department will change in the calendar.
Editing day type:
- Choose a department or an employee in organization structure whose day type needs to be edited,
- Choose days in the calendar to change their type,
- Press the “Set day type” button.
In a pop-up window choose the desired day type and press the “Apply” button. Day type for the selected employee or department will change in the calendar.
Resetting individual settings:
- Choose a department or an employee in organization structure whose settings need to be reset,
- Choose days in a calendar to be reset,
- Press the “Set day type” button.
In a pop-up window choose the day “Inherited from…” day type and press the “Apply” button. Individual settings for the selected employee or department will change in the calendar.
Warning!
Resetting settings with no parental body will lead to applying default settings.
Monitoring settings
Attention!
If all of your licenses are Kickidler Time Tracking, this software version doesn’t allow for managing monitoring settings or working in the viewer. If you want to utilize monitoring functionality and use the viewer, you need to buy Kickidler Employee Monitoring licenses in your Personal Account and assign them to the grabbers.
The “Monitoring settings” section helps configure Viewers that monitor departments and employees as well as manage data collection from departments and employees.
The following settings can be configured in the section:
- For departments and employees
- Pause/resume video collection (including the option to collect video only under certain conditions).
- Pause/resume keystroke logging
- Allow/deny remote control over an employee
- For Viewers
- Allow/deny monitoring departments and employees as well as:
- Allow/deny viewing videos in the viewer
- Allow/deny displaying keystrokes in the viewer
- Allow/deny remote control from the viewer
- Allow/deny monitoring departments and employees as well as:
Options to display settings
The section includes two options for displaying the settings: List (default option) and Table.
The “List” option allows supervisors to view and manage the monitoring settings for each selected element of the organization structure, and the “Table” option allows supervisors to do everything at once.
To change the way settings are displayed, click on the List ![]() or Table
or Table ![]() icon.
icon.
Displaying settings as a List
By selecting this method of displaying the settings, the settings will be displayed for the selected element of the organization structure.
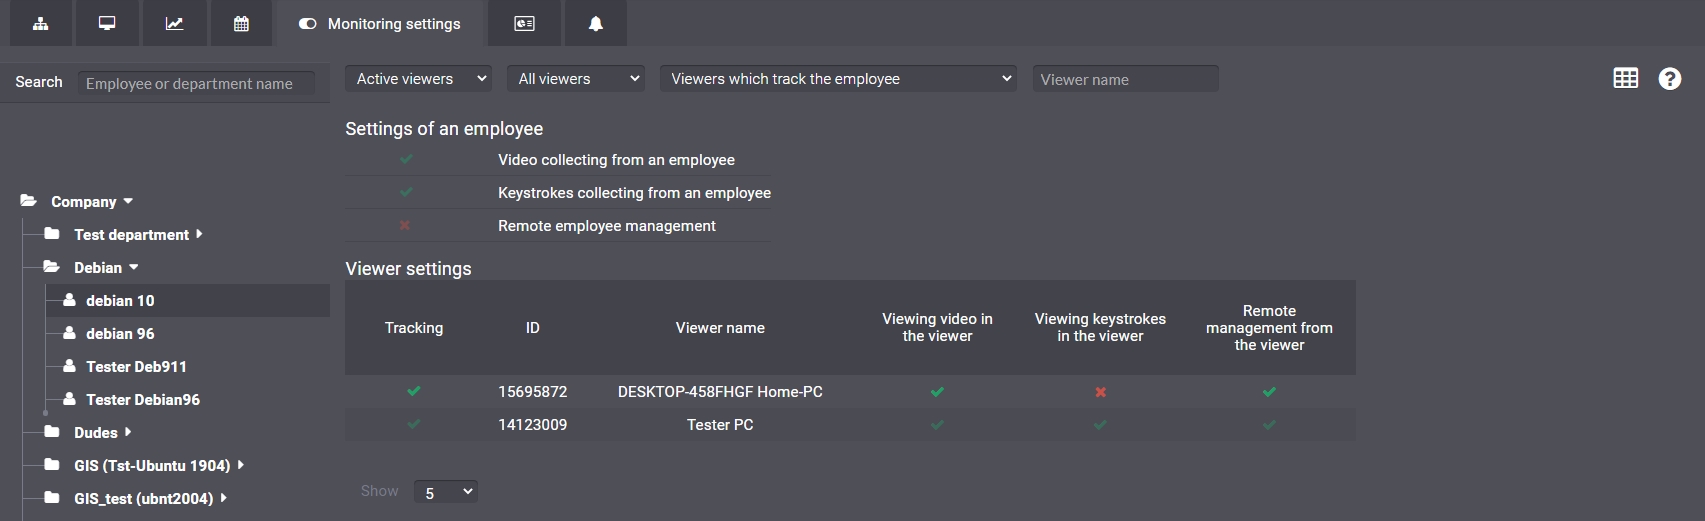
In this case, you can perform the following actions in this section:
- navigate the organization tree,
- navigate the list of viewers,
- select the element of the organization tree, for which the settings will be configured,
- manage employee settings,
- manage viewer settings.
Displaying settings as a Table
By selecting this method of displaying the settings, the settings will be displayed for all elements of the organization structure at once.
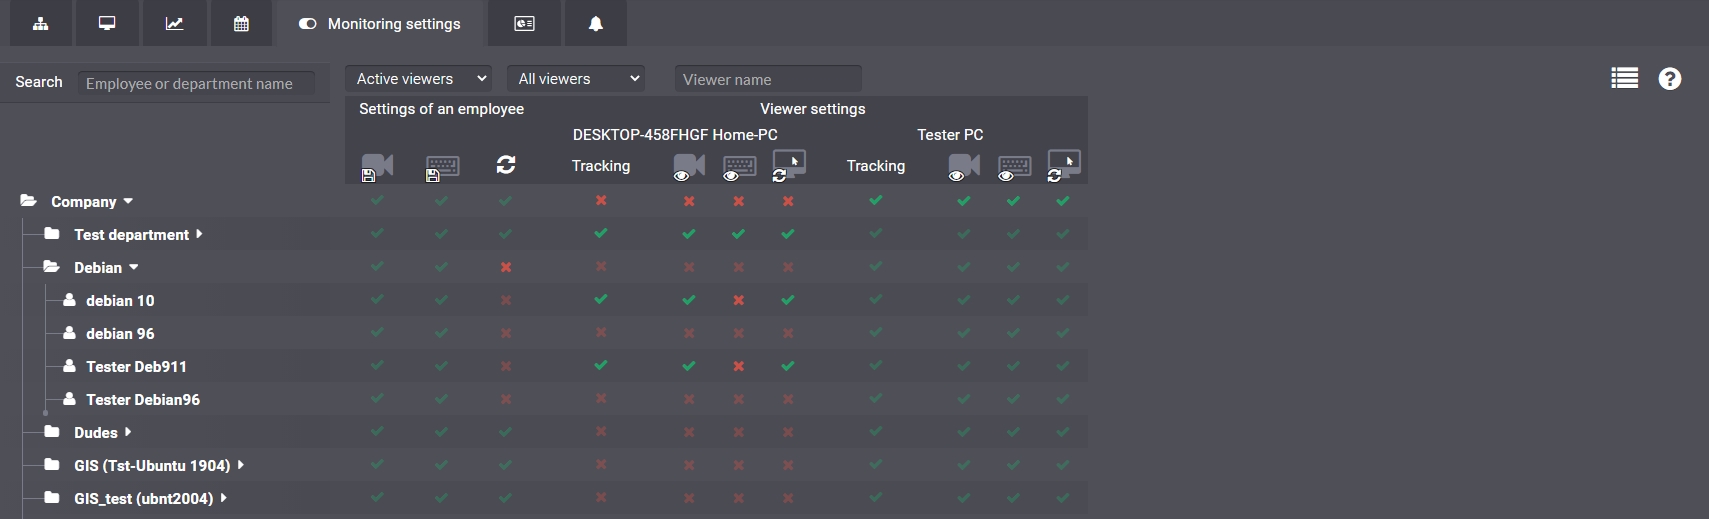
In this case, you can perform the following actions in this section:
- navigate the organization tree,
- navigate the list of viewers,
- select the element of the organization tree, for which the settings will be configured,
- manage employee settings,
- manage viewer settings.
Managing settings
To change the settings, do the following:
- Depending on how the settings are displayed, select or locate the Viewer, department or employee, for which you want to change the settings,
- Select the setting you want to change,
- Click the switch and change the setting to ON
 in order to activate the collection of video and keystrokes or remote control
 - Click the switch and change the setting to OFF
 in order to stop the collection of video and keystrokes or remote control
 - Click the switch and set the inherited value
 in order to inherit the settings from the item above.
Monitoring settings' impact on program functionality
Video recording
Settings for a department or employee. This setting is relevant when video recording of employees’ screens is required.
When you turn on video recording, any viewer that's authorized to monitor employees will be able to monitor videos recorded from the employee's screen. When it's turned off, no video is being recorded. Any viewer that's authorized to monitor employees will have no available video from the moment the video recording is turned off.
Warning!
Remote control functionality is linked to video recording. If you disable video recording, the remote control functionality will also no longer be available.
By default, if video collection is activated for an employee or division, video collection is carried out unconditionally, i.e. video is collected all the time.
You can customize video collection by changing automatic video collection to instead be carried out only for certain events: when a certain app is opened, a certain site is visited, a specified amount of productive activity is achieved, and so on.
In this case, these events will be considered the violation filters.
To configure video event collection, select the employee or division, for which you want to configure video event collection and click the “Configure” button. Then, the video event collection configuration dialog box will appear.
Configuring video event collection
In order to configure video collection by events, select the division or employee in the organization structure, for which you want to collect video by events and click on the “Configure” button. The following dialog box with two lists will be displayed:
- List of violations that can be assigned to an employee or division
- List of violations assigned to an employee or division, namely Individual settings for the employee or division, and Inherited settings from the higher level.
Then select the violation or group of violations from the list on the left, upon occurrence of which video is to be collected, and drag the violation or group of violations to the list on the right, or use the button of the same name.
This way, the violation will get placed to the list of the Individual employee or division settings. Thus, video collection for the specified employee will be performed only when a violation from this list is triggered, not all the time.
After making the necessary changes, click the “OK” button.
Keystroke collection
Settings for a department or employee. This setting is relevant when keystroke collection is required.
When you turn on keystroke collection, any viewer that's authorized to monitor employees will be able to monitor keystrokes collected from the employee's screen. When it's turned off, no keystrokes are being recorded, yet keyboard input activity is still recorded. Any viewer that's authorized to monitor employees will have no available data on keystrokes from the moment the keystroke collection is turned off.
Remote Employee Control
Settings for a department or employee. This setting is relevant when remote employee management is required.
When remote employee control is enabled, any viewer that's authorized to monitor employees will be able to monitor said employees remotely. When it's turned off, employees cannot be managed remotely from any viewer.
Configuring tracking for viewers
A viewer setting that allows or denies a viewer to monitor an employee or department.
Warning!
Default tracking settings that can be changed afterwards are applied to viewers after installation: the first installed company viewer is authorized to monitor the entire organization; all subsequently installed viewers by default are authorized to monitor the department.
Viewing video in viewers
A viewer setting that's responsible for the ability to view video from employees' screens in the viewer.
When video viewing in viewers is enabled, any viewer that's authorized to monitor employees will be able to view employee's video. When it's turned off, the viewer will not be able to view said employee's video for any period of time or to export it.
Warning!
The remote control functionality is linked to the authorization to view videos in the viewer. If you disable video viewing in the viewer, the remote control functionality of this viewer will also no longer be available.
Viewing keystrokes in viewers
A viewer setting that's responsible for the ability to view employees' keystrokes in the viewer.
When keystrokes viewing in viewers is enabled, any viewer that's authorized to monitor employees will be able to view employee's keystrokes. When it's turned off, the viewer will not be able to view keylogger for any period of time or to export it.
Remote control from viewers
This setting is responsible for the ability to use the remote control functionality from the specified viewer in relation to the employee.
When this setting is activated, the viewer will be able to use the remote control functionality in relation to the employee. When this setting is deactivated, the viewer cannot remotely control said employee.
Kickidler self-control
The "Kickidler self-control" section is required to control the state and structure of the employee’s self-control interface.
Read more about the self-control interface here.
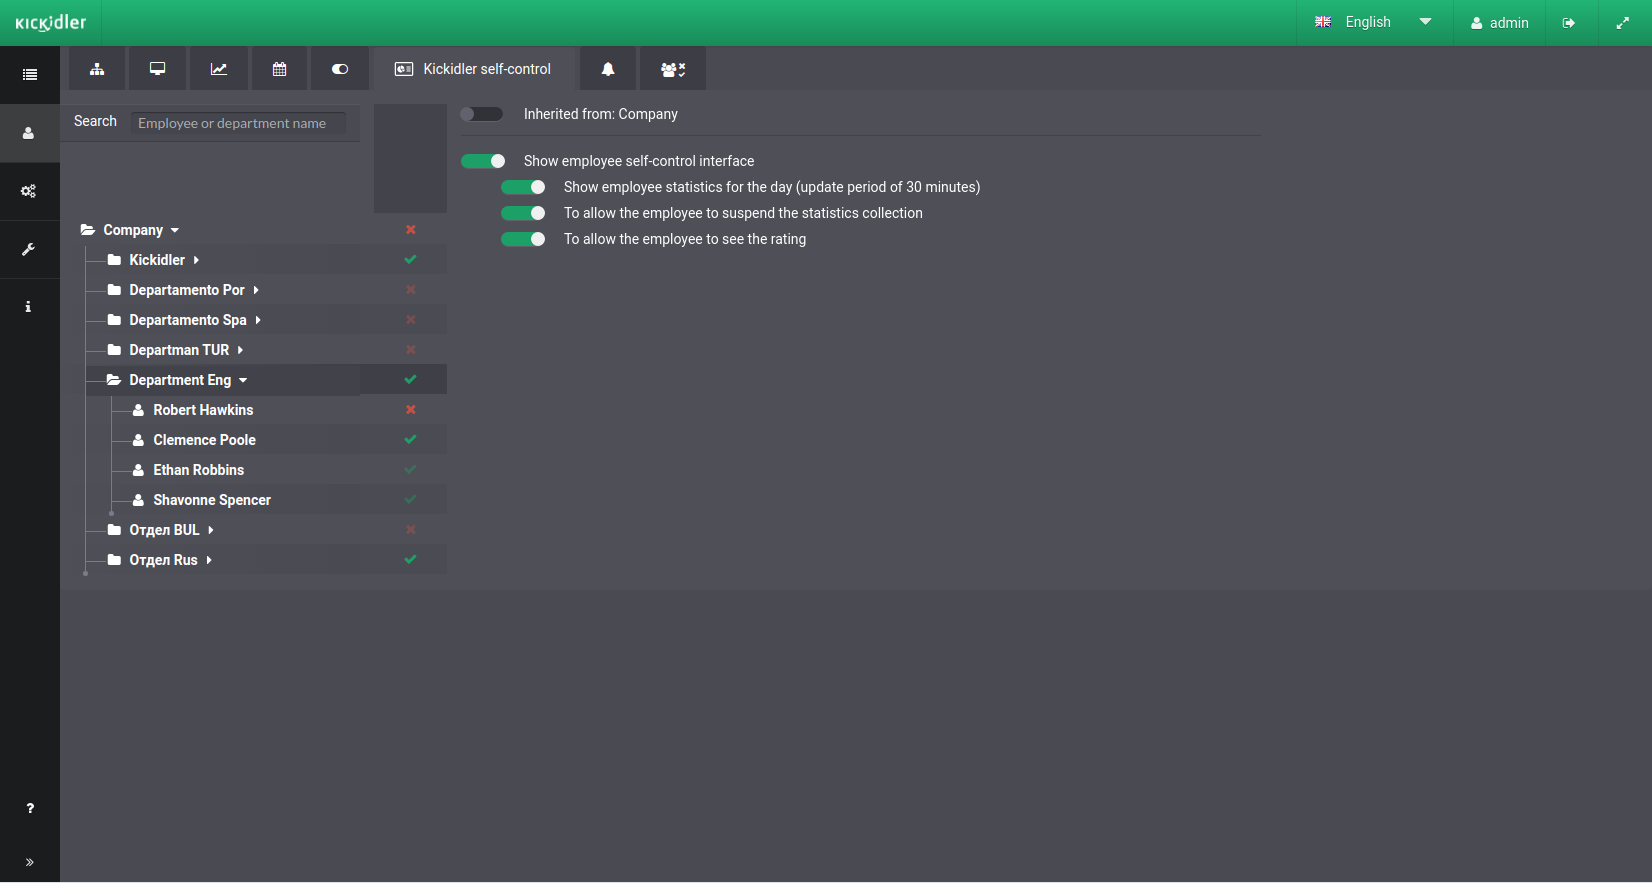
The section contains information about the current state of the self-control interface for each structural element of the organization structure. It also has settings for controlling the structure of the self-control interface.
In the section, you can:
- navigate the organization tree,
- select the elements of the organization tree,
- control the state of the self-control interface,
- configure the self-control interface
Controlling the state of the self-control interface
Self-monitoring interface has several states:
- self-control interface is turned off and is not displayed to the employee,
- self-control interface is turned on - in this case the employee will be able to see the self-control interface, and the corresponding icon will appear in the tray with an option to open it.
By default, self-control interface is turned off and hidden from the employee.
To turn self-control interface on/off:
- select a department or an employee in the organization structure
- click on the "Show self-control interface to the employee"
After that, "Self-control interface" will be displayed to or hidden from the employee.
Self-control interface configuration
To enable the Self-control interface functionality:
- select a department or an employee in the organization structure
- turn on the self-control interface if it is off
- enable the necessary parts of the self-control interface for the employee
Once configured, selected functionality will be hidden from or displayed to the employee in the self-control interface.
Automatic notifications
"Automatic notifications" section is intended to apply automatic notifications to employees that are created in the "Managing automatic notifications" section.
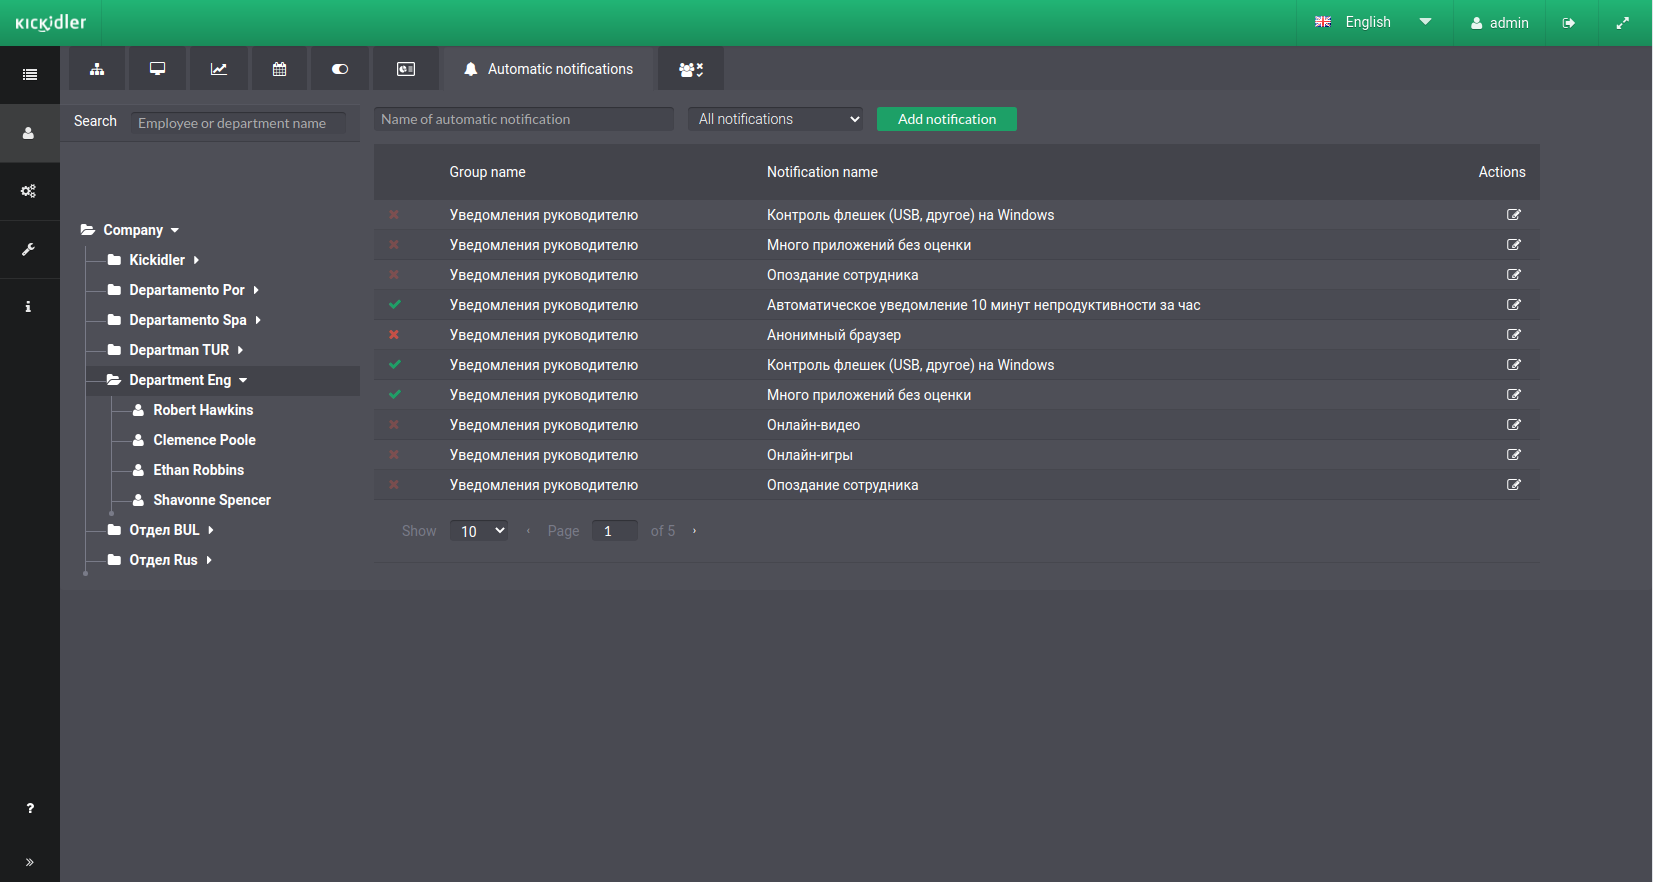
The "Automatic notifications" section has the list of automatic notifications you have created.
In the section, you can:
- navigate the organization tree,
- select the elements of the organization tree,
- navigate the list of automatic notifications,
- search notifications,
- appoint automatic notifications.
You can quickly switch to creating and editing automatic notifications from this section.
Managing automatic notifications
To implement automatic notification:
- select a department or an employee in the organization structure that you want to be automatically notified about
- find the notification you want to implement,
- mark or uncheck the check box for this notification in the list of notifications
Once configured, the automatic notification will be carried out by a department or an employee.
Distributing User Accounts
The "Distributing User Accounts" section is intended to configure employee visibility for the Central Server accounts.

The "Distributing User Accounts" section shows a list of user accounts and their visibility settings for the various elements of the organization tree.
The following actions can be carried out in the section:
- navigating the organization tree,
- navigating the list of accounts,
- managing employee visibility settings for accounts.
Warning!
You can set up the employee visibility for the "manager" category of accounts.
Managing tracking settings
To change the visibility settings for various elements of the organization tree, do the following:
- Locate the account for which you want to adjust the visibility of employees or departments,
- Set the necessary visibility settings for the account in the table cells.