 English
 Русский
 Português
 Español
 Հայերենով
 Türkçe
 Български
 中文
中文 ქართული
 Français
 日本語
日本語 Қазақ
Қазақ- Violations and notifications
- Reports’ mailing
- Branding
"Settings" section is intended for entering other sections’ settings.
"Settings" section contains the following subsections:
- "Violations and notifications" subsection is designed to manage violation filters and notification settings,
- "Reports’ mailing" subsection is intended for creating and editing tasks for automatic report distribution.
Violations and notifications
"Violations and notifications" subsection contains the following tabs:
- "Violation filters" tab is used to control the structure of violation groups. It is also used to control the violation filters settings.
- "Managing automatic notifications" tab is used to manage the structure of notification groups and automatic notification settings.
Violation filters
The section contains a two-level tree that consists of groups and violation filters

Settings of filters of violations
For the filter of violations to work, you should specify the following settings:
- Name and group,
- Category,
- Violation timer,
- Color.
If necessary, you can limit the violation within the working hours.
You need to establish the category-condition when the violation will work. The following categories are provided for violations:
- Unproductive activity – all active apps with “unproductive” efficiency assessment will be considered violations,
- Neutral activity – all active apps with “neutral” efficiency assessment will be considered violations,
- Productive activity – all active apps with “productive” efficiency assessment will be considered violations,
- Uncategorized activity – all active apps without efficiency assessment will be considered violations,
- All activity -– all active apps will be considered violations,
- Inaction – any inaction will be considered violation,
- Program, Web page, Title – specified programs, web pages or titles will be considered violations,
- List of programs, web pages or titles separated by space,
- Activity status of programs, web pages or titles,
- Active – violations will be triggered if an employee uses the program, web page or title,
- Inactive – violations will be triggered if an employee doesn't use the program, web page or title.
You need to specify how long the category should work before the violation will be triggered. This setting is called a violation timer.
The program provides the following violation timer settings:
- Instant timer – violation with such settings will be triggered the moment it's recorded,
- Continuous timer – violation with such settings will be triggered after the specified period of its continuous operation,
- Cumulative timer – violation will be triggered when the specified amount of time for the past period is reached.
Managing violation groups
To add a new violation group:
- Click the “Add Group” button,
- Enter the name of the violation group,
And click the “OK” button.
To edit a violation group:
- Select the violation group you want to edit
- Change the name of the violation group
And click the “OK” button.
To disable all violations of the group:
- Select the violation group that you want to disable
- Click the “Deactivate” button.
After deactivation, all violations of that group will stop working.
To delete a violation group:
- Select the violation group you want to delete
- Click the “Delete” button,
And click the “OK” button in the window that appears.
Managing violation filters
To add a new violation filter:
- Select the group to which you want to add a new violation filter,
- Click on the “Add violation filter” button,
- Enter the name of the new violation filter,
- Change the violation group, if necessary,
- Select the category and timer of the violation,
And click the “OK” button. Once added, the violation will appear as part of the group.
To edit a violation:
- Select the violation you want to edit,
- Change the violation settings,
- name,
- group,
- category,
- timer,
And click the “OK” button.
To deactivate violation:
- Select the violation you want to deactivate
- Click the "Deactivate” button
Once turned off, the violation will stop working.
To delete a violation filter:
- Select the violation filter you want to delete
- Click the “Delete” button
And click the “OK” button in the window that appears.
To relocate violation
- Select the violation you want to relocate,
- Drag and drop the violation to another group
Or
- Select the violation you want to relocate,
- Select the violation group, to which you want to move the violation, from the drop-down list,
and click OK.
Managing automatic notifications
The section contains a two-level tree that consists of notification groups and automatic notifications.
Before creating automatic mail notifications, connect the mail server in the "Mail server" subsection of the "Configuration" section, which will deliver messaged to the list of recipients.
Setting up automatic notifications
For each automatic notification, enter the following settings:
- Automatic notification name,
- Notification group, in which the notification will be located,
- Events that you need to be notified about,
- Notification threshold, to indicate the time delay between notifications received by an employee or supervisor. If you customize "0", employees or supervisors will receive all notifications.
- Necessity to save the notification triggers for the system use,
- Means of informing.
Variations of events in the system
Events can be generated in the program based on:
- Violation filters - events based on violation filters are created by converting a violation that has been triggered,
- Violation groups - events based on violation groups are created by converting the triggered violations from a violation group,
- Work schedules - these events are based on employees’ schedules or deviations from them.
Ways to receive notifications
The program is able to notify about the events in the following way:
• By mail - notification will be sent to the specified e-mail address and will contain the specified text
• To the employee - notifications will be sent to the employee on the grabber into the notification interface.
Ways to set up automatic notifications
There are several ways to set up automatic for notification:
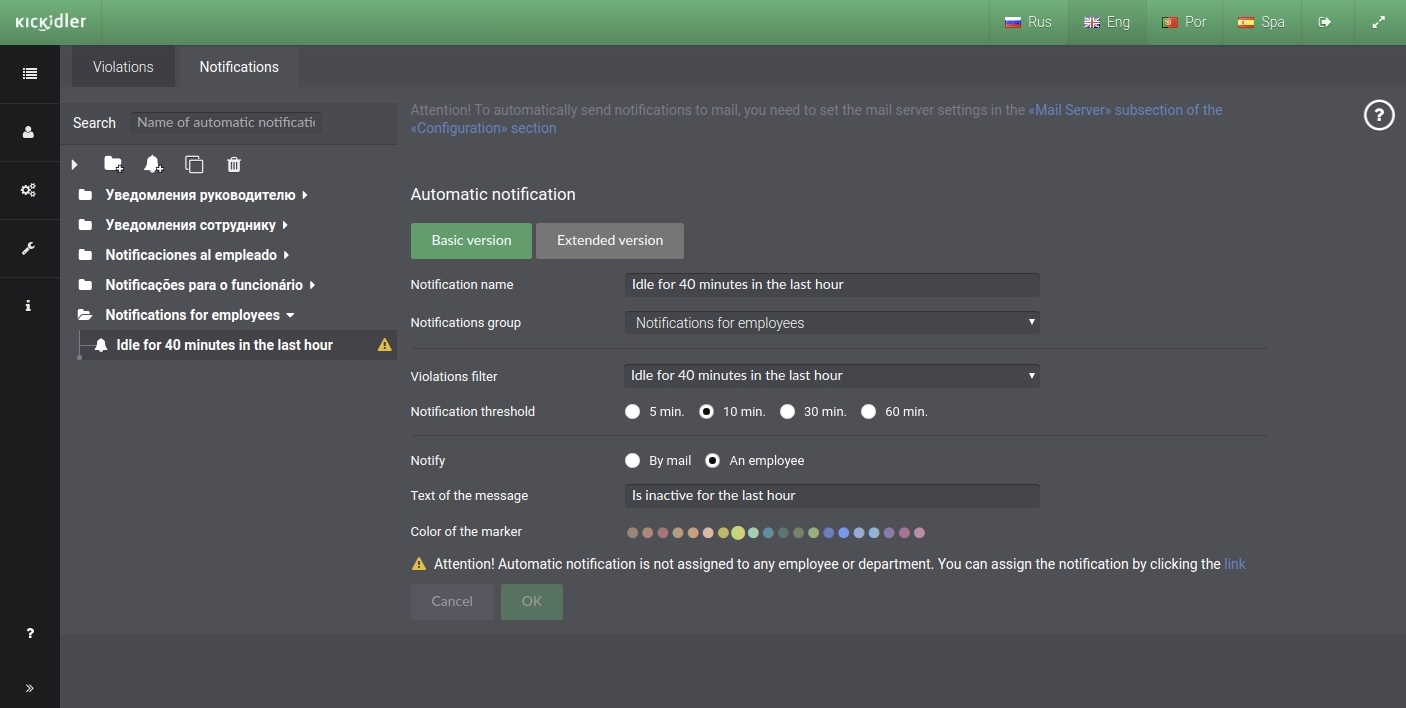
- In the "Basic version" mode, you can specify the following parameters:
- notification name,
- notification group,
- one event based on the filter of violations,
- threshold of notifications,
- one means of informing.
- In the "Advanced version" mode, you can specify the following parameters:
- notification name,
- notification group,
- any number of events,
- threshold of notifications,
- any number of notifications by mail,
- means of informing:
- informing by mail,
- informing the employee.
In the basic version, the automatic notification name is accompanied by the name of the event. The name can be changed if necessary.
Notification groups
To add a new notification group:
- Click the "Add Group" button,
- Enter the name of the notification group,
And click OK.
To edit a notification group:
- Select the notification group you want to edit
- Change the name of the notification group
And click OK.
To delete a notification group:
- Select the notification group you want to delete
- Click the "Delete" button,
And click OK in the window that appears.
Automatic notifications
To add a new automatic notification:
- Select the notification group, to which you want to add automatic notification,
- Click the "Add notification" button,
- Choose the way to set up automatic notification,
- Enter notification parameters
And click OK. Once added, the automatic notification will appear as part of the notification group.
To add a notification in the "Basic version" mode:
- Select the notification group, to which you want to add automatic notification,
- Click the "Add notification" button,
- Click the "Basic version" button,
- Enter the automatic notification name
- Select the notification group, to which you want to add automatic notification,
- Select the violation filter that needs to be converted to events
- Specify notification threshold
- Choose how you want to receive the notification
- Informing by mail
- Enter the e-mail address and the text of the message
- Informing the employee
- Enter the text of the message
- Choose the color of the notification
- Informing by mail
And click "OK" button.
In the basic version, automatic notification is triggered at the beginning of the violation and is automatically logged to the report.
To add a notification in the "Advanced version" mode:
- Select the notification group, to which you want to add automatic notification,
- Click the "Add notification" button,
- Click the "Advanced version" button,
- Enter the automatic notification name,
- Select the notification group, to which you want to add automatic notification,
- Set the setting whether to save the notification for the system use,
- Specify events
- Choose the "Events" tab
- Choose event type
- Specify the way of converting to event
- Press the "Add event" button
- When there is a large number of events, you can specify "Notification threshold"
- Choose the notification method
- Informing by mail
- Choose the "Notifications by mail" tab
- Enter the e-mail address and the text of the message
- Press the "Add a recipient" button
- Informing the employee
- Choose the "Notifycation to an employee" tab
- Enter the text of the message
- Choose the color of the notification
- Informing by mail
And click OK.
To relocate an automatic notification:
- Select the notification you want to relocate
- Drag and drop the notification to another group
Or
- Select the notification you want to move,
- Select the violation group, to which you want to move the automatic violation, from the drop-down list,
And click OK.
To edit an automatic notification:
- Select the automatic notification you want to edit,
- Change the notification parameters,
And click OK.
To copy an automatic notification:
- Select the automatic notification you want to copy,
- Click the "Copy notification" button
After copying, the automatic notification will appear as part of the notification group with the "-copy" postscript
To delete automatic notification:
- Select the automatic notification you want to delete,
- Click the "Delete" button,
And click OK in the window that appears.
Reports’ mailing
The subsection "Reports’ mailing" is used for creating and editing tasks for sending reports by the e-mail lists.
Before creating tasks for sending reports, enter settings for the mail server in the "Mail server" subsection of the "Configuration" section, which will deliver messages with reports.
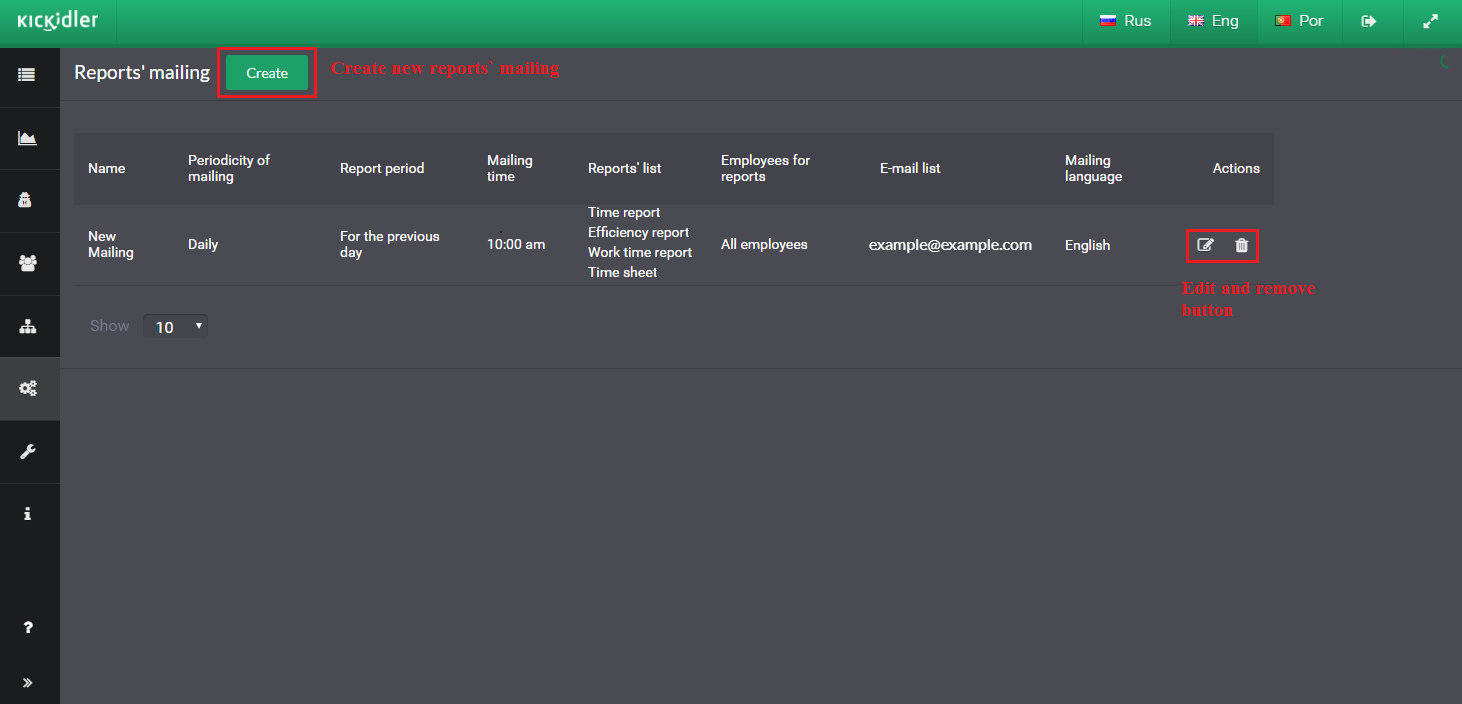
Within rows Mailing name and E-mail list, there is the ability to apply descending and ascending data filtering. To filter data in row, click its title.
To create a mailing task, click on the "Create" button in the “Reports’ mailing” subsection.
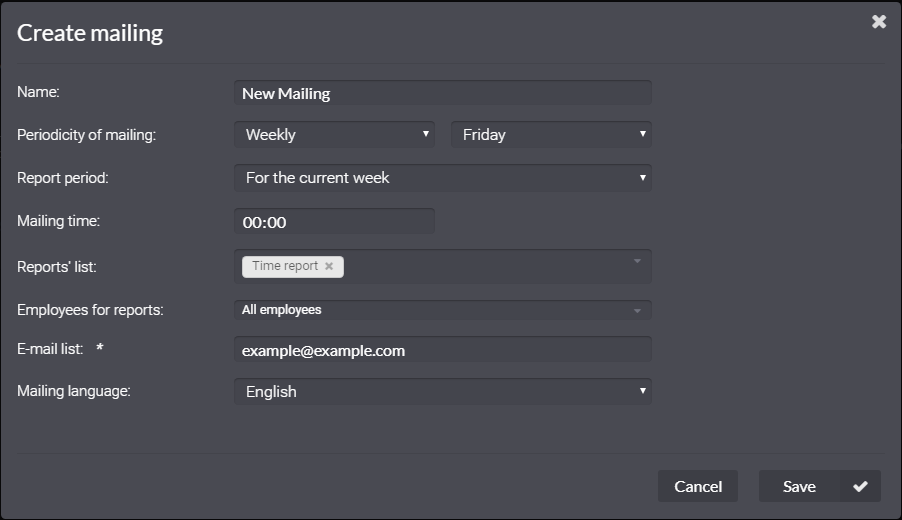
In the opened dialog box enter the following parameters:
- Mailing name,
- Periodicity of mailing,
- Report period,
- Mailing time — the exact time of sending and the day of the week or month on which the mailing will be carried out,
- Reports’ list,
- Employees for reports,
- E-mail list — e-mails of recipients separated by commas,
- Mailing language — letters will be sent to the recipients on this language
and click on the “Save” button.
Attention! If you have created a monthly task for mailing, but the selected number of mailing is not in a calendar month, the mailing will come on the last day of the month. If you want to receive monthly mails on the last day of the month, choose the 31st.
To change the task for mailing, find it in the table and click on the pencil icon. In the opened dialog box enter all the necessary changes and click on the "Save" button.
To delete a task for mailing, find it in the table and click on the trash icon. In the opened dialog box click the "Remove" button.
The program implements the functionality of sending lost reports.
If for some reason a posting does not occur according to the schedule, the reports of each sending lost will be arrived in the next sending according to the schedule. For example, the server was off or weekends reports sending was disabled.
Branding
The “Branding” subsection is used for customizing the visual design of interfaces, allowing you to use elements of corporate identity and logo.
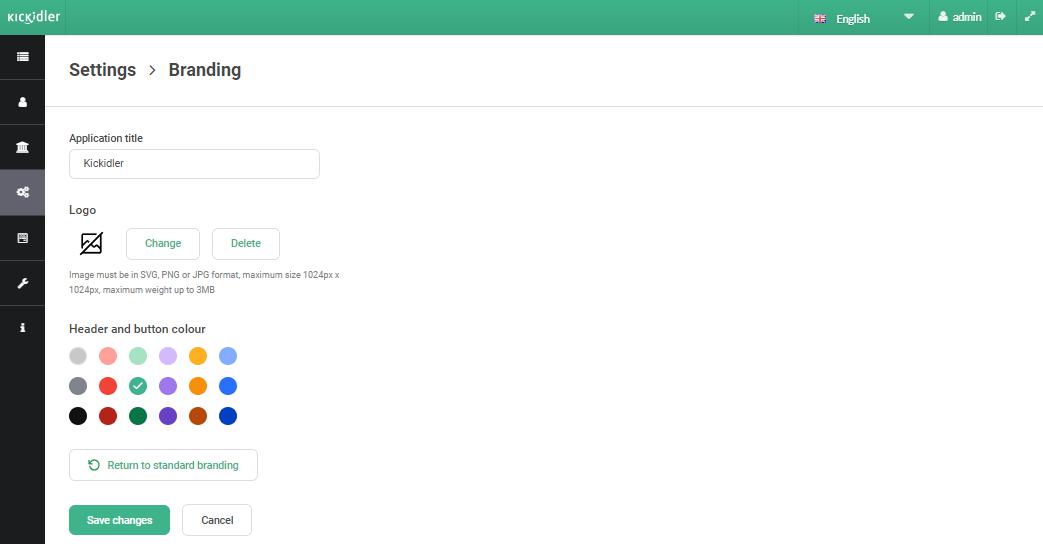
In this section you can change the following parameters:
- Application name: once the name is changed, it will appear in the page title.
- Logo: once the new logo is uploaded, it will appear in the header on the left side of the Central Server, in the Project Control web interface and in the employee interface in the grabber.
- Header and buttons color: once the preset is changed, the new color will be applied to the header and buttons on the Central Server and in the web interface of Project Control.
You can customize the settings separately or all at once.
Customizing settings:
To edit the application name:
- Enter a new name for the application.
- Click the Save Changes button.
To upload a new logo:
- Click the "Change" button.
- Select a logo file that meets the following requirements: SVG, PNG or JPG format, maximum width – 1024 x 1024 px, maximum file size – up to 3 MB.
- Click the Save Changes button.
To revert to the default Kickidler logo:
- Click the "Delete" button.
- Click the "Save Changes" button.
To edit the color of the header and buttons:
- Select a color from the preset.
- Click the Save Changes button.
To reset selected settings that have not been saved:
- Click the "Cancel" button.
To return to the standard interface design (green color with standard Kickidler logo):
- Click the "Return to Standard Branding" button.